Epson 5510 Owners Manual - Page 107
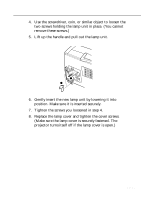
Tighten the screws you loosened in step 4., position. Make sure it is inserted securely.
 |
View all Epson 5510 manuals
Add to My Manuals
Save this manual to your list of manuals |
Page 107 highlights
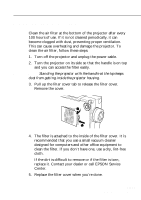
4. Use the screwdriver, coin, or similar object to loosen the two screws holding the lamp unit in place. (You cannot remove these screws.) 5. Lift up the handle and pull out the lamp unit. 2 1 6. Gently insert the new lamp unit by lowering it into position. Make sure it is inserted securely. 7. Tighten the screws you loosened in step 4. 8. Replace the lamp cover and tighten the cover screws. (Make sure the lamp cover is securely fastened. The projector turns itself off if the lamp cover is open.) s s s s s s Replacing the Lamp 87
-
 1
1 -
2
-
3
-
4
-
5
-
6
-
7
-
8
-
9
-
10
-
11
-
12
-
13
-
14
-
15
-
16
-
17
-
18
-
19
-
20
-
21
-
22
-
23
-
24
-
25
-
26
-
27
-
28
-
29
-
30
-
31
-
32
-
33
-
34
-
35
-
36
-
37
-
38
-
39
-
40
-
41
-
42
-
43
-
44
-
45
-
46
-
47
-
48
-
49
-
50
-
51
-
52
-
53
-
54
-
55
-
56
-
57
-
58
-
59
-
60
-
61
-
62
-
63
-
64
-
65
-
66
-
67
-
68
-
69
-
70
-
71
-
72
-
73
-
74
-
75
-
76
-
77
-
78
-
79
-
80
-
81
-
82
-
83
-
84
-
85
-
86
-
87
-
88
-
89
-
90
-
91
-
92
-
93
-
94
-
95
-
96
-
97
-
98
-
99
-
100
-
101
-
 102
102 -
 103
103 -
 104
104 -
 105
105 -
 106
106 -
 107
107 -
 108
108 -
 109
109 -
 110
110 -
 111
111 -
 112
112 -
113
-
114
-
115
-
116
-
117
-
118
-
119
-
120
-
121
-
122
-
123
-
124
-
125
-
126
-
127
-
128
 |
 |

Replacing the Lamp
■■■■■
■
87
4.
Use the screwdriver, coin, or similar object to loosen the
two screws holding the lamp unit in place. (You cannot
remove these screws.)
5.
Lift up the handle and pull out the lamp unit.
6.
Gently insert the new lamp unit by lowering it into
position. Make sure it is inserted securely.
7.
Tighten the screws you loosened in step 4.
8.
Replace the lamp cover and tighten the cover screws.
(Make sure the lamp cover is securely fastened. The
projector turns itself off if the lamp cover is open.)
2
1