Epson 5510 Owners Manual - Page 3
Quick Start
 |
View all Epson 5510 manuals
Add to My Manuals
Save this manual to your list of manuals |
Page 3 highlights
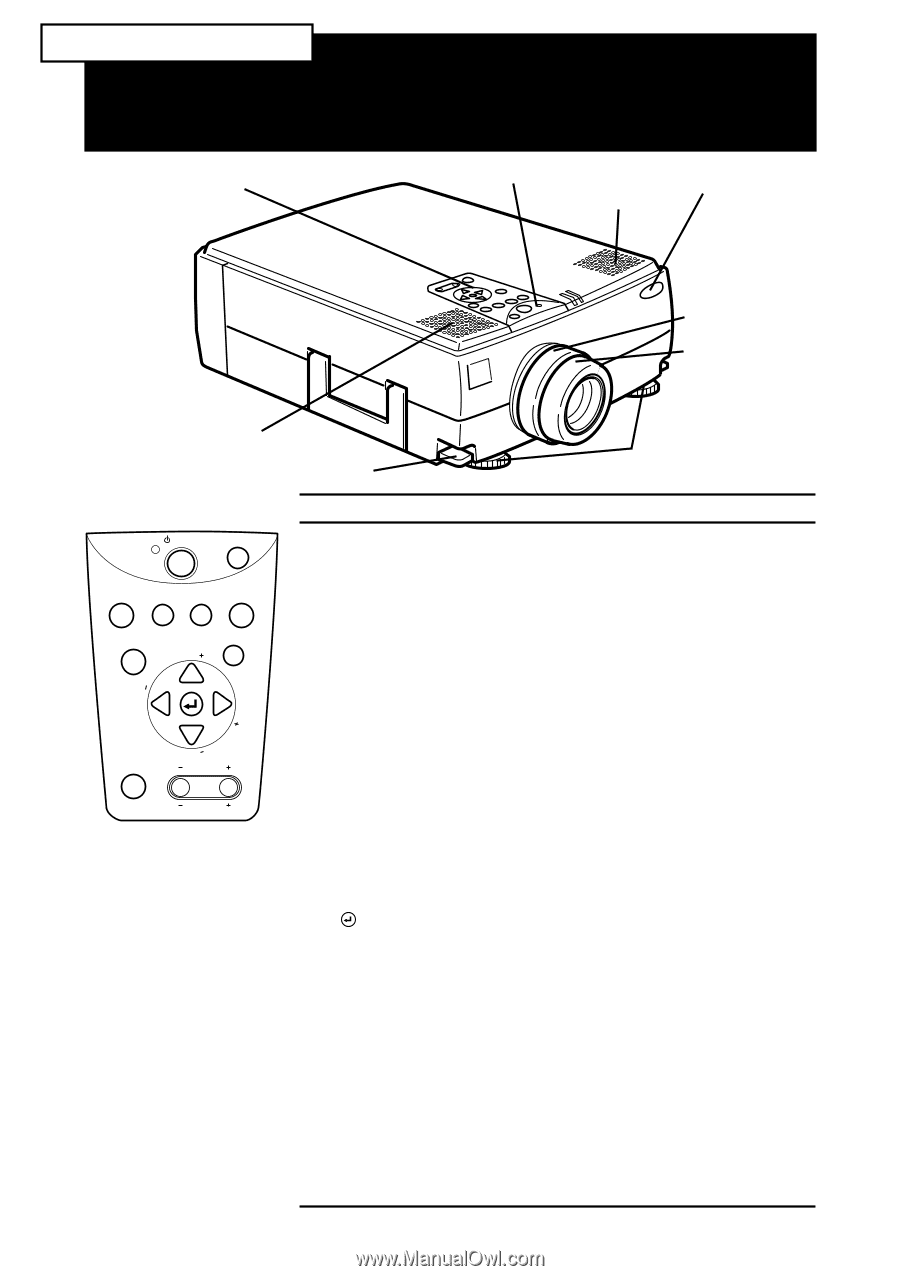
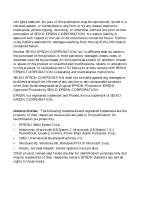
EMP-7350/7250/5350 QUICK START operation panel operation indicator speaker remoto control receiver zoom ring focus ring speaker foot adjust lever front foot Power Help Computer A/Vmute Resize Video Menu Esc Sync Tracking Tracking Sync Keystone Shift Volume Operation Panel Button Function Power Turns the projector on or off. Help Displays the Help menu. Computer Switches the computer input source.Pressing the button once switches to the Computer1, and pressing twice switches to the Computer2/BNC. A/V mute Turns off/on the audio/videio output of the projector. To turn on the audio/video output, press the A/V mute button again, or either the Esc or the Volume button. Resize Switches the resolution to the Window display or Resize display. Video Switches the video input source. Pressing the button once switches to the composite Video, pressing twice switches to the S-Video and pressing three times switches to the component video. Menu Displays or hides the menu. Esc Terminates the current function that you have been executing . If you press the Esc button when a menu or help is displayed, you can go back to the previous menu layer. Enter Selects a menu option. If you press the Enter button when a menu or help is displayed, you can access to the next menu layer. If you press the Enter button when a menu or help is not displayed, you can optimize the computer image. Sync +/- Synchronize the computer's graphic signal. Use these buttons to adjust an overall image that is fuzzy or streaked, or to select menu items during menu operations. Tracking +/- Match the projectos's internal clock to various computer graphic signals (tracking adjustment). Use these buttons to adjust an image with vertical fuzzy lines, or to change numeric settings during menu operations. Shift Pressing the shift and keystone button at the same time can increase or decrease the sound volume. Keystone +/- Adjusts the keystone.
-
 1
1 -
 2
2 -
 3
3 -
 4
4 -
 5
5 -
 6
6 -
 7
7 -
 8
8 -
 9
9 -
10
-
11
-
12
-
13
-
14
-
15
-
16
-
17
-
18
-
19
-
20
-
21
-
22
-
23
-
24
-
25
-
26
-
27
-
28
-
29
-
30
-
31
-
32
-
33
-
34
-
35
-
36
-
37
-
38
-
39
-
40
-
41
-
42
-
43
-
44
-
45
-
46
-
47
-
48
-
49
-
50
-
51
-
52
-
53
-
54
-
55
-
56
-
57
-
58
-
59
-
60
-
61
-
62
-
63
-
64
-
65
-
66
-
67
-
68
-
69
-
70
-
71
-
72
-
73
-
74
-
75
-
76
-
77
-
78
-
79
-
80
-
81
-
82
-
83
-
84
-
85
-
86
-
87
-
88
-
89
-
90
-
91
-
92
-
93
-
94
-
95
-
96
-
97
-
98
-
99
-
100
-
101
-
102
-
103
-
104
-
105
-
106
-
107
-
108
-
109
-
110
-
111
-
112
-
113
-
114
-
115
-
116
-
117
-
118
-
119
-
120
-
121
-
122
-
123
-
124
-
125
-
126
-
127
-
128
 |
 |