Epson 875DCS Printer Basics - Page 53
Close Image Expert, if necessary., Stick for D.
 |
View all Epson 875DCS manuals
Add to My Manuals
Save this manual to your list of manuals |
Page 53 highlights
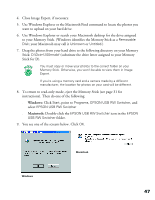
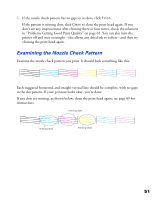
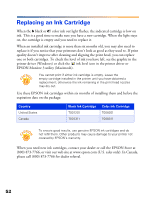
4. Close Image Expert, if necessary. 5. Use Windows Explorer or the Macintosh Find command to locate the photos you want to upload on your hard drive. 6. Use Windows Explorer or search your Macintosh desktop for the drive assigned to your Memory Stick. (Windows identifies the Memory Stick as a Removable Disk; your Macintosh may call it Unknown or Untitled.) 7. Drag the photos from your hard drive to the following directory on your Memory Stick: D:\Dcim\100msdcf (substitute the drive letter assigned to your Memory Stick for D). You must copy or move your photos to the correct folder on your Memory Stick. Otherwise, you won't be able to view them in Image Expert. If you're using a memory card and a camera made by a different manufacturer, the location for photos on your card will be different. 8. To return to read-only mode, eject the Memory Stick (see page 31 for instructions). Then do one of the following: s Windows: Click Start, point to Programs, EPSON USB RW Switcher, and select EPSON USB RW Switcher s Macintosh: Double-click the EPSON USB RW Switcher icon in the EPSON USB RW Switcher folder. 9. You see one of the screens below. Click OK. Windows Macintosh 47
-
 1
1 -
2
-
3
-
4
-
5
-
6
-
7
-
8
-
9
-
10
-
11
-
12
-
13
-
14
-
15
-
16
-
17
-
18
-
19
-
20
-
21
-
22
-
23
-
24
-
25
-
26
-
27
-
28
-
29
-
30
-
31
-
32
-
33
-
34
-
35
-
36
-
37
-
38
-
39
-
40
-
41
-
42
-
43
-
44
-
45
-
46
-
47
-
 48
48 -
 49
49 -
 50
50 -
 51
51 -
 52
52 -
 53
53 -
 54
54 -
 55
55 -
 56
56 -
 57
57 -
 58
58 -
59
-
60
-
61
-
62
-
63
-
64
-
65
-
66
-
67
-
68
-
69
-
70
-
71
-
72
-
73
-
74
-
75
-
76
-
77
-
78
-
79
-
80
-
81
-
82
-
83
-
84
-
85
-
86
-
87
-
88
-
89
-
90
-
91
-
92
-
93
-
94
 |
 |
