Epson 875DCS Printer Basics - Page 56
On the Utility menu, click the, Follow the instructions on - 875dc printer head replacement
 |
View all Epson 875DCS manuals
Add to My Manuals
Save this manual to your list of manuals |
Page 56 highlights
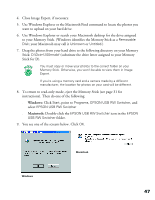
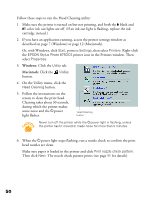
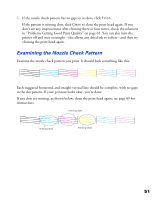
Follow these steps to run the Head Cleaning utility: 1. Make sure the printer is turned on but not printing, and both the B black and A color ink out lights are off. (If an ink out light is flashing, replace the ink cartridge instead.) 2. If you have an application running, access the printer settings window as described on page 7 (Windows) or page 12 (Macintosh). Or, with Windows, click Start, point to Settings, then select Printers. Right-click the EPSON Stylus Photo 875DCS printer icon in the Printers window. Then select Properties. 3. Windows: Click the Utility tab. Macintosh: Click the Utility button. 4. On the Utility menu, click the Head Cleaning button. 5. Follow the instructions on the screen to clean the print head. Cleaning takes about 30 seconds, during which the printer makes some noise and the Ppower light flashes. Head Cleaning button Never turn off the printer while the Ppower light is flashing, unless the printer hasn't moved or made noise for more than 5 minutes. 6. When the Ppower light stops flashing, run a nozzle check to confirm the print head nozzles are clean. Make sure paper is loaded in the printer and click Print nozzle check pattern. Then click Next. The nozzle check pattern prints (see page 51 for details). 50
-
 1
1 -
2
-
3
-
4
-
5
-
6
-
7
-
8
-
9
-
10
-
11
-
12
-
13
-
14
-
15
-
16
-
17
-
18
-
19
-
20
-
21
-
22
-
23
-
24
-
25
-
26
-
27
-
28
-
29
-
30
-
31
-
32
-
33
-
34
-
35
-
36
-
37
-
38
-
39
-
40
-
41
-
42
-
43
-
44
-
45
-
46
-
47
-
48
-
49
-
50
-
 51
51 -
 52
52 -
 53
53 -
 54
54 -
 55
55 -
 56
56 -
 57
57 -
 58
58 -
 59
59 -
 60
60 -
 61
61 -
62
-
63
-
64
-
65
-
66
-
67
-
68
-
69
-
70
-
71
-
72
-
73
-
74
-
75
-
76
-
77
-
78
-
79
-
80
-
81
-
82
-
83
-
84
-
85
-
86
-
87
-
88
-
89
-
90
-
91
-
92
-
93
-
94
 |
 |
