Epson ActionNote 500C User Manual - Page 58
Installing a Memory Module, Lower the memory module straight down into the computer
 |
View all Epson ActionNote 500C manuals
Add to My Manuals
Save this manual to your list of manuals |
Page 58 highlights
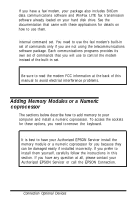
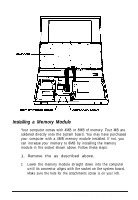
Installing a Memory Module Your computer comes with 4MB or 8MB of memory. Four MB are soldered directly onto the system board. You may have purchased your computer with a 4MB memory module installed. If not, you can increase your memory to 8MB by installing the memory module in the socket shown above. Follow these steps: 1. Remove the as described above. 2. Lower the memory module straight down into the computer until its connector aligns with the socket on the system board. Make sure the hole for the attachments screw is on your left. Connecting Optional Devices 4-13
-
 1
1 -
2
-
3
-
4
-
5
-
6
-
7
-
8
-
9
-
10
-
11
-
12
-
13
-
14
-
15
-
16
-
17
-
18
-
19
-
20
-
21
-
22
-
23
-
24
-
25
-
26
-
27
-
28
-
29
-
30
-
31
-
32
-
33
-
34
-
35
-
36
-
37
-
38
-
39
-
40
-
41
-
42
-
43
-
44
-
45
-
46
-
47
-
48
-
49
-
50
-
51
-
52
-
 53
53 -
 54
54 -
 55
55 -
 56
56 -
 57
57 -
 58
58 -
 59
59 -
 60
60 -
 61
61 -
 62
62 -
 63
63 -
64
-
65
-
66
-
67
-
68
-
69
-
70
-
71
-
72
-
73
-
74
-
75
-
76
-
77
-
78
-
79
-
80
-
81
-
82
-
83
-
84
-
85
-
86
-
87
-
88
-
89
-
90
-
91
-
92
-
93
-
94
-
95
-
96
-
97
-
98
-
99
-
100
-
101
-
102
-
103
-
104
-
105
-
106
-
107
-
108
-
109
-
110
-
111
-
112
-
113
-
114
-
115
-
116
-
117
-
118
-
119
-
120
-
121
 |
 |

Installing a Memory Module
Your computer comes with 4MB or 8MB of memory. Four MB are
soldered directly onto the system board. You may have purchased
your computer with a 4MB memory module installed. If not, you
can increase your memory to 8MB by installing the memory
module in the socket shown above. Follow these steps:
1. Remove the as described above.
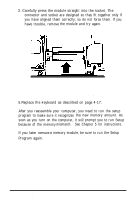
2.
Lower the memory module straight down into the computer
until its connector aligns with the socket on the system board.
Make sure the hole for the attachments screw is on your left.
Connecting Optional Devices
4-13