Epson ActionNote 500C User Manual - Page 59
tighten the screw on the left side of the module., When the connector is firmly attached to the socket
 |
View all Epson ActionNote 500C manuals
Add to My Manuals
Save this manual to your list of manuals |
Page 59 highlights
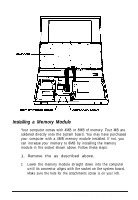
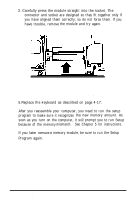
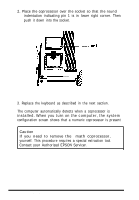
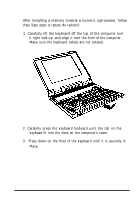
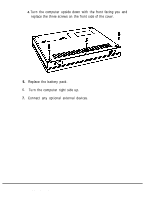
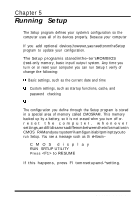
3. Carefully press the module straight into the socket. The connector and socket are designed so they fit together only if you have aIigned them correctly; so do not force them. If you have trouble, remove the module and try again. 4. When the connector is firmly attached to the socket, insert and tighten the screw on the left side of the module. 5.Replace the keyboard as described on page 4-17. After you reassemble your computer, you need to run the setup program to make sure it recognizes the new memory amount. As soon as you turn on the computer, it wiIl prompt you to run Setup because of the memory mismatch. See Chapter 5 for instructions. If you later remove a memory module, be sure to run the Setup Program again. 4-14 Connecting Optional Devices
-
 1
1 -
2
-
3
-
4
-
5
-
6
-
7
-
8
-
9
-
10
-
11
-
12
-
13
-
14
-
15
-
16
-
17
-
18
-
19
-
20
-
21
-
22
-
23
-
24
-
25
-
26
-
27
-
28
-
29
-
30
-
31
-
32
-
33
-
34
-
35
-
36
-
37
-
38
-
39
-
40
-
41
-
42
-
43
-
44
-
45
-
46
-
47
-
48
-
49
-
50
-
51
-
52
-
53
-
 54
54 -
 55
55 -
 56
56 -
 57
57 -
 58
58 -
 59
59 -
 60
60 -
 61
61 -
 62
62 -
 63
63 -
 64
64 -
65
-
66
-
67
-
68
-
69
-
70
-
71
-
72
-
73
-
74
-
75
-
76
-
77
-
78
-
79
-
80
-
81
-
82
-
83
-
84
-
85
-
86
-
87
-
88
-
89
-
90
-
91
-
92
-
93
-
94
-
95
-
96
-
97
-
98
-
99
-
100
-
101
-
102
-
103
-
104
-
105
-
106
-
107
-
108
-
109
-
110
-
111
-
112
-
113
-
114
-
115
-
116
-
117
-
118
-
119
-
120
-
121
 |
 |
