Epson C1440AXIS User Manual - Page 25
Connecting the AXIS 1440 to an Ethernet Network, Installation and Setup Overview,
 |
UPC - 667026001031
View all Epson C1440AXIS manuals
Add to My Manuals
Save this manual to your list of manuals |
Page 25 highlights
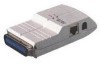
Section 3: Installing and Configuring the Print Server Connecting the AXIS 1440 to an Ethernet Network Follow these steps to connect the AXIS 1440 to the network: 1. Turn the printer off and disconnect the AXIS 1440 external power supply. 2. Locate the serial number on the bottom of the print server and write it down. You need this number for network configuration. 3. Connect the AXIS 1440 to the printer's parallel port. 4. Connect your AXIS 1440 to the network using a twisted pair (10BaseT) cable. 5. Turn the printer on and connect the external power supply to the AXIS 1440. The AXIS 1440 is successfully connected to the network when the network indicator begins to flash. Now you're ready to install your server on your network. See Installation and Setup Overview on page 16 for information about what to do next. Note: t Each AXIS 1440 Print Server is pre-configured with a unique node address that is identical to the serial number. You can use the AXIS 1440's internal web server or AXIS NetPilot to change the node address. See Section 9 Management and Configuration for more information. AXIS 1440 User's Manual 15
-
 1
1 -
2
-
3
-
4
-
5
-
6
-
7
-
8
-
9
-
10
-
11
-
12
-
13
-
14
-
15
-
16
-
17
-
18
-
19
-
 20
20 -
 21
21 -
 22
22 -
 23
23 -
 24
24 -
 25
25 -
 26
26 -
 27
27 -
 28
28 -
 29
29 -
 30
30 -
31
-
32
-
33
-
34
-
35
-
36
-
37
-
38
-
39
-
40
-
41
-
42
-
43
-
44
-
45
-
46
-
47
-
48
-
49
-
50
-
51
-
52
-
53
-
54
-
55
-
56
-
57
-
58
-
59
-
60
-
61
-
62
-
63
-
64
-
65
-
66
-
67
-
68
-
69
-
70
-
71
-
72
-
73
-
74
-
75
-
76
-
77
-
78
-
79
-
80
-
81
-
82
-
83
-
84
-
85
-
86
-
87
-
88
-
89
-
90
-
91
-
92
-
93
-
94
-
95
-
96
-
97
-
98
-
99
-
100
 |
 |
