Epson L500V Reference Guide - Page 58
orientation for the picture you want to take.
 |
UPC - 010343851726
View all Epson L500V manuals
Add to My Manuals
Save this manual to your list of manuals |
Page 58 highlights
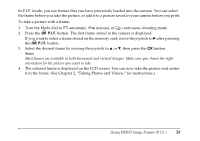
In P.I.F. mode, you use frames that you have previously loaded into the camera. You can select the frame before you take the picture, or add it to a picture saved in your camera before you print. To take a picture with a frame: 1. Turn the Mode dial to automatic, manual, or continuous shooting mode. 2. Press the P.I.F. button. The first frame stored in the camera is displayed. If you want to select a frame stored on the memory card, move the joystick to r after pressing the P.I.F. button. 3. Select the desired frame by moving the joystick to u or d, then press the OK button. Note: Most frames are available in both horizontal and vertical designs. Make sure you choose the right orientation for the picture you want to take. 4. The selected frame is displayed on the LCD screen. You can now take the picture and center it in the frame. (See Chapter 2, "Taking Photos and Videos," for instructions.) Using PRINT Image Framer (P.I.F.) 58
-
 1
1 -
2
-
3
-
4
-
5
-
6
-
7
-
8
-
9
-
10
-
11
-
12
-
13
-
14
-
15
-
16
-
17
-
18
-
19
-
20
-
21
-
22
-
23
-
24
-
25
-
26
-
27
-
28
-
29
-
30
-
31
-
32
-
33
-
34
-
35
-
36
-
37
-
38
-
39
-
40
-
41
-
42
-
43
-
44
-
45
-
46
-
47
-
48
-
49
-
50
-
51
-
52
-
 53
53 -
 54
54 -
 55
55 -
 56
56 -
 57
57 -
 58
58 -
 59
59 -
 60
60 -
 61
61 -
 62
62 -
 63
63 -
64
-
65
-
66
-
67
-
68
-
69
-
70
-
71
-
72
-
73
-
74
-
75
-
76
-
77
-
78
-
79
-
80
-
81
-
82
-
83
-
84
-
85
-
86
-
87
-
88
-
89
-
90
-
91
 |
 |
