Epson L500V Reference Guide - Page 64
Printing All Your Saved Photos
 |
UPC - 010343851726
View all Epson L500V manuals
Add to My Manuals
Save this manual to your list of manuals |
Page 64 highlights
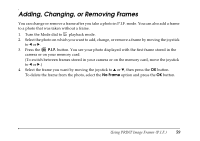
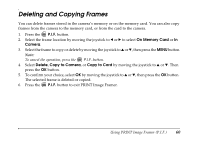
To print with white borders, turn off the date stamp, or change other settings, see page 67. 10. Press the MENU button to return to the Print screen. 11. Press the print button to start printing. When printing is complete, press the OK button. Note: The LCD screen goes dark after a moment. Press any camera button to turn it back on. If you need to cancel printing, press the MENU button. Printing All Your Saved Photos You can print all photos stored on the camera. 1. Connect the camera to the printer as described on page 62 and turn on the camera. 2. Turn the Mode dial to playback, then press the print button. 3. Select All Images by moving the joystick to u or d, then press the OK button. 4. If you want to print just one copy, go to step 5. To print more than one copy of each picture, press the OK button and move the joystick to u to select the number of copies you want. Then press OK. 5. Move the joystick to d to select Print Setting, then press OK. 6. Move the joystick to r to select Paper Type. 7. Move the joystick to d to select the size of paper you loaded in the printer and press OK. To print with white borders, turn off the date stamp, or change other settings, see page 67. 8. Press the MENU button to return to the Print screen. 9. Press the print button to start printing. When printing is complete, press the OK button. Using Direct Print 64
-
 1
1 -
2
-
3
-
4
-
5
-
6
-
7
-
8
-
9
-
10
-
11
-
12
-
13
-
14
-
15
-
16
-
17
-
18
-
19
-
20
-
21
-
22
-
23
-
24
-
25
-
26
-
27
-
28
-
29
-
30
-
31
-
32
-
33
-
34
-
35
-
36
-
37
-
38
-
39
-
40
-
41
-
42
-
43
-
44
-
45
-
46
-
47
-
48
-
49
-
50
-
51
-
52
-
53
-
54
-
55
-
56
-
57
-
58
-
 59
59 -
 60
60 -
 61
61 -
 62
62 -
 63
63 -
 64
64 -
 65
65 -
 66
66 -
 67
67 -
 68
68 -
 69
69 -
70
-
71
-
72
-
73
-
74
-
75
-
76
-
77
-
78
-
79
-
80
-
81
-
82
-
83
-
84
-
85
-
86
-
87
-
88
-
89
-
90
-
91
 |
 |
