Epson P-2000 User Manual - Page 33
Creating a New Album, button or select
 |
UPC - 010343852112
View all Epson P-2000 manuals
Add to My Manuals
Save this manual to your list of manuals |
Page 33 highlights
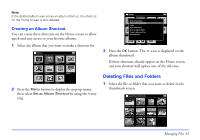
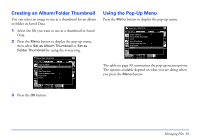
5 Select the album you want to copy to and press the OK button. The files are copied. Creating a New Album 1 Follow steps 1 through 4 under "Copying Files to an Album." 2 Select New and press the OK button. Saved Data / 2004.08.26 Please select an album DSC00331.NJPeGw DSC00330.mpg PC_DATA Scenary Flower Travel DSC00327.JPG DSC00326.JPG Album1 Travel2 DSC00329.JPG DSC00325.JPG DSC00328.JPG DSC00324.JPG DSC00323.JPG DSC00322.JPG DSC00321.JPG 3 If you want to use one of the default album names, select the name from the displayed list, then press the OK button. The selected files are copied. 4 If you want to create a new name for the album, select Input name and press the OK button. The on-screen keyboard appears: Saved Data / 2004.08.26 T DSC00331.JPG CDSACP0S0330.mpg DSC0B0A32C9K.JPSGPACDESC00328.JPG ABCDEFG 1 2 3 H I J K LMN 4 5 6 OPQRS TU 7 8 9 DSC00327.JVPG W DSXC003Y26.JPZG _DSC00325.JPG 0DSC00324.JPG Cancel OK DSC00323.JPG DSC00322.JPG DSC00321.JPG 5 Select each letter by using the 4-way ring, then press the OK button to input the selected letter. ❍ To switch the letters between uppercase and lowercase, select CAPS and press the OK button. ❍ To delete the last letter input, press the Cancel button or select BACKSPACE on the screen and press the OK button. To delete everything that was input, select Cancel on the screen and press the OK button. 6 After you input the name, select OK on the screen by using the 4-way ring, then press the OK button to save it. Managing Files 33
-
 1
1 -
2
-
3
-
4
-
5
-
6
-
7
-
8
-
9
-
10
-
11
-
12
-
13
-
14
-
15
-
16
-
17
-
18
-
19
-
20
-
21
-
22
-
23
-
24
-
25
-
26
-
27
-
 28
28 -
 29
29 -
 30
30 -
 31
31 -
 32
32 -
 33
33 -
 34
34 -
 35
35 -
 36
36 -
 37
37 -
 38
38 -
39
-
40
-
41
-
42
-
43
-
44
-
45
-
46
-
47
-
48
-
49
-
50
-
51
-
52
-
53
-
54
-
55
-
56
-
57
-
58
-
59
-
60
-
61
-
62
-
63
-
64
-
65
-
66
-
67
-
68
-
69
-
70
-
71
-
72
-
73
 |
 |
