Epson P-2000 User Manual - Page 45
this screen, of copies, choose
 |
UPC - 010343852112
View all Epson P-2000 manuals
Add to My Manuals
Save this manual to your list of manuals |
Page 45 highlights
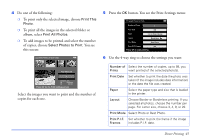
4 Do one of the following: ❍ To print only the selected image, choose Print This Photo. ❍ To print all the images in the selected folder or album, select Print All Photos. ❍ To add images to be printed and select the number of copies, choose Select Photos to Print. You see this screen: Select Photos for print order 5 Press the OK button. You see the Print Settings menu: Select Photos to Print Number of Prints 1 Print Date ON Paper Layout 4×6 in. Prem. Glossy Borderless Print Mode Best Photo Print P.I.F. Frames Yes Press OK to start printing 6 Use the 4-way ring to choose the settings you want: Total Sheets 08 3 DSC00331. JPG ON 2003.10.25 ON 640+480 Press OK for the Print Settings screen Select the images you want to print and the number of copies for each one. Number of Select the number of copies, up to 99, you Prints want printed of the selected photo(s). Print Date Set whether to print the date the photo was taken (if the image includes date information) or the date the file was created. Paper Select the paper type and size that is loaded in the printer. Layout Choose Border or Borderless printing. If you selected all photos, choose the number per page. For Letter size, choose 3, 4, 9, or 20. Print Mode Select Photo or Best Photo. Print P.I.F. Set whether to print the frame if the image Frames includes P.I.F. data. Direct Printing 45
-
 1
1 -
2
-
3
-
4
-
5
-
6
-
7
-
8
-
9
-
10
-
11
-
12
-
13
-
14
-
15
-
16
-
17
-
18
-
19
-
20
-
21
-
22
-
23
-
24
-
25
-
26
-
27
-
28
-
29
-
30
-
31
-
32
-
33
-
34
-
35
-
36
-
37
-
38
-
39
-
 40
40 -
 41
41 -
 42
42 -
 43
43 -
 44
44 -
 45
45 -
 46
46 -
 47
47 -
 48
48 -
 49
49 -
 50
50 -
51
-
52
-
53
-
54
-
55
-
56
-
57
-
58
-
59
-
60
-
61
-
62
-
63
-
64
-
65
-
66
-
67
-
68
-
69
-
70
-
71
-
72
-
73
 |
 |
