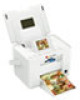
Epson PictureMate Charm - PM 225 Basics - Page 21
include P.I.M. PRINT Image Matching, Basic Print Settings, Enhance, Fix Photo, P.I.M., Standard
 |
View all Epson PictureMate Charm - PM 225 manuals
Add to My Manuals
Save this manual to your list of manuals |
Page 21 highlights
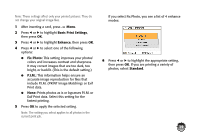
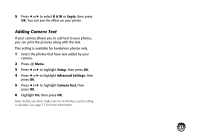
Note: These settings affect only your printed pictures. They do not change your original image files. 1 After inserting a card, press Menu. 2 Press l or r to highlight Basic Print Settings, then press OK. 3 Press l or r to highlight Enhance, then press OK. 4 Press l or r to select one of the following options: ● Fix Photo: This setting improves your photos' colors and increases contrast and sharpness. It may correct images that are too dark, too bright, or backlit. (This is the default setting.) ● P.I.M.: This information helps ensure an accurate image reproduction for files that include P.I.M. (PRINT Image Matching) or Exif Print data. ● None: Prints photos as is or bypasses P.I.M. or Exif Print data. Select this setting for the fastest printing. 5 Press OK to apply the selected setting. Note: The setting you select applies to all photos in the current print job. If you select Fix Photo, you see a list of 4 enhance modes: 6 Press l or r to highlight the appropriate setting, then press OK. If you are printing a variety of photos, select Standard. 19
-
 1
1 -
2
-
3
-
4
-
5
-
6
-
7
-
8
-
9
-
10
-
11
-
12
-
13
-
14
-
15
-
 16
16 -
 17
17 -
 18
18 -
 19
19 -
 20
20 -
 21
21 -
 22
22 -
 23
23 -
 24
24 -
 25
25 -
 26
26 -
27
-
28
-
29
-
30
-
31
-
32
-
33
-
34
-
35
-
36
-
37
-
38
-
39
-
40
-
41
-
42
-
43
-
44
-
45
-
46
-
47
-
48
-
49
-
50
-
51
-
52
-
53
-
54
-
55
-
56
-
57
-
58
-
59
-
60
-
61
-
62
-
63
-
64
-
65
-
66
 |
 |
