Epson PowerLite Cinema 500 User Manual - Page 51
Managing Your Settings, To save or recall settings on your computer
 |
View all Epson PowerLite Cinema 500 manuals
Add to My Manuals
Save this manual to your list of manuals |
Page 51 highlights
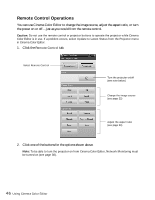
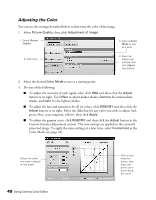
Managing Your Settings In addition to your projector's memory settings, you can store any number of additional settings on your computer's hard drive. You can also use Cinema Color Editor to rename or delete memory settings stored on your projector. To save or recall settings on your computer: In Cinema Color Editor, open the File menu, then choose one of the following: ■ Save setting to store the current Cinema Color Editor settings on your computer's hard drive. ■ Set from file to adjust the picture from settings previously saved on your hard drive. Note: You can also transfer settings directly between the projector's memory and your computer's hard drive using the File Read and Save In File buttons (shown in the figure below). To rename a memory setting stored on the projector: 1. Select Picture Quality, then click Memory management and choose Edit. 2. Click the tab where your setting is stored (Standard or Advance), select the setting whose name you want to change, then click Memory Name Change. 1. Select Standard or Advance 2. Select the setting whose name you want to change 3. Click Memory Name Change 3. Type a name up to 12 characters long, then click OK. To clear a memory setting stored on the projector: 1. Select Picture Quality, then click Memory management and choose Edit. 2. Select the setting you want to delete, then click Memory Reset and confirm the deletion. Using Cinema Color Editor 51
-
 1
1 -
2
-
3
-
4
-
5
-
6
-
7
-
8
-
9
-
10
-
11
-
12
-
13
-
14
-
15
-
16
-
17
-
18
-
19
-
20
-
21
-
22
-
23
-
24
-
25
-
26
-
27
-
28
-
29
-
30
-
31
-
32
-
33
-
34
-
35
-
36
-
37
-
38
-
39
-
40
-
41
-
42
-
43
-
44
-
45
-
 46
46 -
 47
47 -
 48
48 -
 49
49 -
 50
50 -
 51
51 -
 52
52 -
 53
53 -
 54
54 -
 55
55 -
 56
56 -
57
-
58
-
59
-
60
-
61
-
62
-
63
-
64
-
65
-
66
-
67
-
68
-
69
-
70
-
71
-
72
-
73
-
74
-
75
-
76
-
77
-
78
-
79
-
80
-
81
-
82
-
83
-
84
 |
 |
