Epson Stylus Pro 7900 Proofing Edition Printer Guide - Page 181
Not Enough Ink Or, Replace The Right Side
 |
View all Epson Stylus Pro 7900 Proofing Edition manuals
Add to My Manuals
Save this manual to your list of manuals |
Page 181 highlights
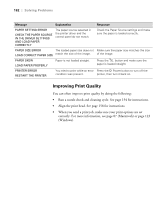
Solving Problems | 181 Message NOT ENOUGH EMPTY SPACE REPLACE THE RIGHT SIDE MAINTENANCE TANK NOZZLE CHECK ERROR PRESS THE BUTTON NOZZLE CLOG DETECTED NOT ENOUGH INK OR SPACE IN MAINT TANK PAPER CUT ERROR REMOVE UNCUT PAPER PAPER EJECT ERROR REMOVE PAPER FROM PRINTER PAPER ERROR LOAD PAPER CORRECTLY PAPER JAM REMOVE PAPER PAPER LOW PAPER OUT LOAD PAPER PAPER RELEASED LOAD PAPER PAPER SENSOR ERROR PRESS THE BUTTON LOAD DIFFERENT PAPER Explanation The maintenance tank is too full for head cleaning. Response Replace the maintenance tank; see page 169. Auto cleaning cannot be performed. Press the button to clear the error, then try cleaning again. If necessary, cancel cleaning from the computer, then restart the printer. Not enough ink or maintenance Select YES, then follow the instructions to tank capacity for head cleaning. replace the ink cartridge or maintenance tank. Roll paper was not cut correctly. The cutter may be blunt or incorrectly installed. Roll paper is used with the cut sheet setting. Press the button and open the front cover. Remove the uncut paper. Reinstall or replace the cutter if necessary; see page 165. Press the button and remove the paper. Paper is not loaded correctly. Press the correctly. button, then reload paper Paper has jammed in the printer. The paper roll is almost finished. No paper is loaded. The button has been pressed with no paper loaded. Paper ran out during printing. The button has been pressed. Press the button and remove the jammed paper; see page 191 for more information. Replace the roll. Load paper. Press the button, then load paper. Press the button and remove the roll paper core. Then load another roll. Load paper, then press the button. The paper is not detected. Press the button to clear the error, then select the right paper. 181
-
 1
1 -
2
-
3
-
4
-
5
-
6
-
7
-
8
-
9
-
10
-
11
-
12
-
13
-
14
-
15
-
16
-
17
-
18
-
19
-
20
-
21
-
22
-
23
-
24
-
25
-
26
-
27
-
28
-
29
-
30
-
31
-
32
-
33
-
34
-
35
-
36
-
37
-
38
-
39
-
40
-
41
-
42
-
43
-
44
-
45
-
46
-
47
-
48
-
49
-
50
-
51
-
52
-
53
-
54
-
55
-
56
-
57
-
58
-
59
-
60
-
61
-
62
-
63
-
64
-
65
-
66
-
67
-
68
-
69
-
70
-
71
-
72
-
73
-
74
-
75
-
76
-
77
-
78
-
79
-
80
-
81
-
82
-
83
-
84
-
85
-
86
-
87
-
88
-
89
-
90
-
91
-
92
-
93
-
94
-
95
-
96
-
97
-
98
-
99
-
100
-
101
-
102
-
103
-
104
-
105
-
106
-
107
-
108
-
109
-
110
-
111
-
112
-
113
-
114
-
115
-
116
-
117
-
118
-
119
-
120
-
121
-
122
-
123
-
124
-
125
-
126
-
127
-
128
-
129
-
130
-
131
-
132
-
133
-
134
-
135
-
136
-
137
-
138
-
139
-
140
-
141
-
142
-
143
-
144
-
145
-
146
-
147
-
148
-
149
-
150
-
151
-
152
-
153
-
154
-
155
-
156
-
157
-
158
-
159
-
160
-
161
-
162
-
163
-
164
-
165
-
166
-
167
-
168
-
169
-
170
-
171
-
172
-
173
-
174
-
175
-
 176
176 -
 177
177 -
 178
178 -
 179
179 -
 180
180 -
 181
181 -
 182
182 -
 183
183 -
 184
184 -
 185
185 -
 186
186 -
187
-
188
-
189
-
190
-
191
-
192
-
193
-
194
-
195
-
196
-
197
-
198
-
199
-
200
-
201
-
202
-
203
-
204
-
205
-
206
-
207
-
208
 |
 |
