Epson Stylus Pro 7900 Proofing Edition Printer Guide - Page 78
Using the Paper Basket, Catching Printouts in Front of the Printer
 |
View all Epson Stylus Pro 7900 Proofing Edition manuals
Add to My Manuals
Save this manual to your list of manuals |
Page 78 highlights
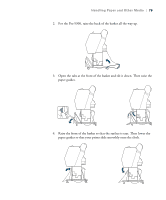
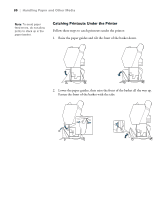
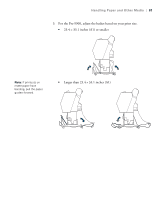
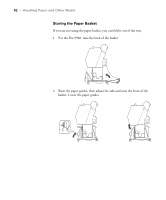
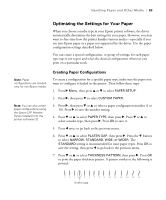
78 | Handling Paper and Other Media If you've selected a non-standard platen gap, the following symbols appear in the corner of the display to remind you of the narrow or wide setting: Widest Wider Wide Narrow When you switch media, don't forget to change the setting back to STANDARD. If you're printing on non-Epson media and not using the Epson driver, you may also need to create a paper configuration to optimize your results. See page 83 for more information. Using the Paper Basket The paper basket attaches to your printer and catches your printouts as they come out. The basket keeps your printouts from getting dirty or scratched. You can set it up either to catch the paper under the printer or in front of the printer. Catching Printouts in Front of the Printer Follow the steps below to set up the basket in front of the printer. Use this method for paper more than 19 mil (0.5 mm) thick or any prints that are 62 inches (157 cm) or longer (for the Pro 9900) or 36 inches (91 cm) or longer (for the Pro 7900). 1. If you are using the paper guides, make sure they are in front of the basket, as shown below. 78
-
 1
1 -
2
-
3
-
4
-
5
-
6
-
7
-
8
-
9
-
10
-
11
-
12
-
13
-
14
-
15
-
16
-
17
-
18
-
19
-
20
-
21
-
22
-
23
-
24
-
25
-
26
-
27
-
28
-
29
-
30
-
31
-
32
-
33
-
34
-
35
-
36
-
37
-
38
-
39
-
40
-
41
-
42
-
43
-
44
-
45
-
46
-
47
-
48
-
49
-
50
-
51
-
52
-
53
-
54
-
55
-
56
-
57
-
58
-
59
-
60
-
61
-
62
-
63
-
64
-
65
-
66
-
67
-
68
-
69
-
70
-
71
-
72
-
 73
73 -
 74
74 -
 75
75 -
 76
76 -
 77
77 -
 78
78 -
 79
79 -
 80
80 -
 81
81 -
 82
82 -
 83
83 -
84
-
85
-
86
-
87
-
88
-
89
-
90
-
91
-
92
-
93
-
94
-
95
-
96
-
97
-
98
-
99
-
100
-
101
-
102
-
103
-
104
-
105
-
106
-
107
-
108
-
109
-
110
-
111
-
112
-
113
-
114
-
115
-
116
-
117
-
118
-
119
-
120
-
121
-
122
-
123
-
124
-
125
-
126
-
127
-
128
-
129
-
130
-
131
-
132
-
133
-
134
-
135
-
136
-
137
-
138
-
139
-
140
-
141
-
142
-
143
-
144
-
145
-
146
-
147
-
148
-
149
-
150
-
151
-
152
-
153
-
154
-
155
-
156
-
157
-
158
-
159
-
160
-
161
-
162
-
163
-
164
-
165
-
166
-
167
-
168
-
169
-
170
-
171
-
172
-
173
-
174
-
175
-
176
-
177
-
178
-
179
-
180
-
181
-
182
-
183
-
184
-
185
-
186
-
187
-
188
-
189
-
190
-
191
-
192
-
193
-
194
-
195
-
196
-
197
-
198
-
199
-
200
-
201
-
202
-
203
-
204
-
205
-
206
-
207
-
208
 |
 |