Epson Stylus Pro 7900 Proofing Edition Printer Guide - Page 48
Connecting to Your System, you have a standard, shielded cable 10 feet 6 m long or less.
 |
View all Epson Stylus Pro 7900 Proofing Edition manuals
Add to My Manuals
Save this manual to your list of manuals |
Page 48 highlights
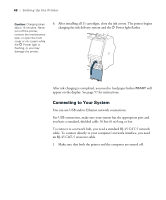
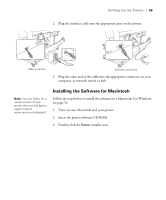
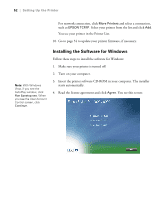
48 | Setting Up the Printer Caution: Charging takes about 15 minutes. Never turn off the printer, remove the maintenance tank, or open the front cover or ink covers while the P Power light is flashing, or you may damage the printer. 6. After installing all 11 cartridges, close the ink covers. The printer begins charging the ink delivery system and the P Power light flashes. After ink charging is completed, you need to load paper before READY will appear on the display. See page 57 for instructions. Connecting to Your System You can use USB and/or Ethernet network connections. For USB connection, make sure your system has the appropriate port and you have a standard, shielded cable 10 feet (6 m) long or less. To connect to a network hub, you need a standard RJ-45 CAT-5 network cable. To connect directly to your computer's network interface, you need an RJ-45 CAT-5 crossover cable. 1. Make sure that both the printer and the computer are turned off. 48
-
 1
1 -
2
-
3
-
4
-
5
-
6
-
7
-
8
-
9
-
10
-
11
-
12
-
13
-
14
-
15
-
16
-
17
-
18
-
19
-
20
-
21
-
22
-
23
-
24
-
25
-
26
-
27
-
28
-
29
-
30
-
31
-
32
-
33
-
34
-
35
-
36
-
37
-
38
-
39
-
40
-
41
-
42
-
 43
43 -
 44
44 -
 45
45 -
 46
46 -
 47
47 -
 48
48 -
 49
49 -
 50
50 -
 51
51 -
 52
52 -
 53
53 -
54
-
55
-
56
-
57
-
58
-
59
-
60
-
61
-
62
-
63
-
64
-
65
-
66
-
67
-
68
-
69
-
70
-
71
-
72
-
73
-
74
-
75
-
76
-
77
-
78
-
79
-
80
-
81
-
82
-
83
-
84
-
85
-
86
-
87
-
88
-
89
-
90
-
91
-
92
-
93
-
94
-
95
-
96
-
97
-
98
-
99
-
100
-
101
-
102
-
103
-
104
-
105
-
106
-
107
-
108
-
109
-
110
-
111
-
112
-
113
-
114
-
115
-
116
-
117
-
118
-
119
-
120
-
121
-
122
-
123
-
124
-
125
-
126
-
127
-
128
-
129
-
130
-
131
-
132
-
133
-
134
-
135
-
136
-
137
-
138
-
139
-
140
-
141
-
142
-
143
-
144
-
145
-
146
-
147
-
148
-
149
-
150
-
151
-
152
-
153
-
154
-
155
-
156
-
157
-
158
-
159
-
160
-
161
-
162
-
163
-
164
-
165
-
166
-
167
-
168
-
169
-
170
-
171
-
172
-
173
-
174
-
175
-
176
-
177
-
178
-
179
-
180
-
181
-
182
-
183
-
184
-
185
-
186
-
187
-
188
-
189
-
190
-
191
-
192
-
193
-
194
-
195
-
196
-
197
-
198
-
199
-
200
-
201
-
202
-
203
-
204
-
205
-
206
-
207
-
208
 |
 |
