Epson SureColor P800 Screen Print Edition User Manual - Page 111
Paper Size, Borderless, Quality, Normal, Front Fine Art, Paper Handling, Setup, Orientation
 |
View all Epson SureColor P800 Screen Print Edition manuals
Add to My Manuals
Save this manual to your list of manuals |
Page 111 highlights
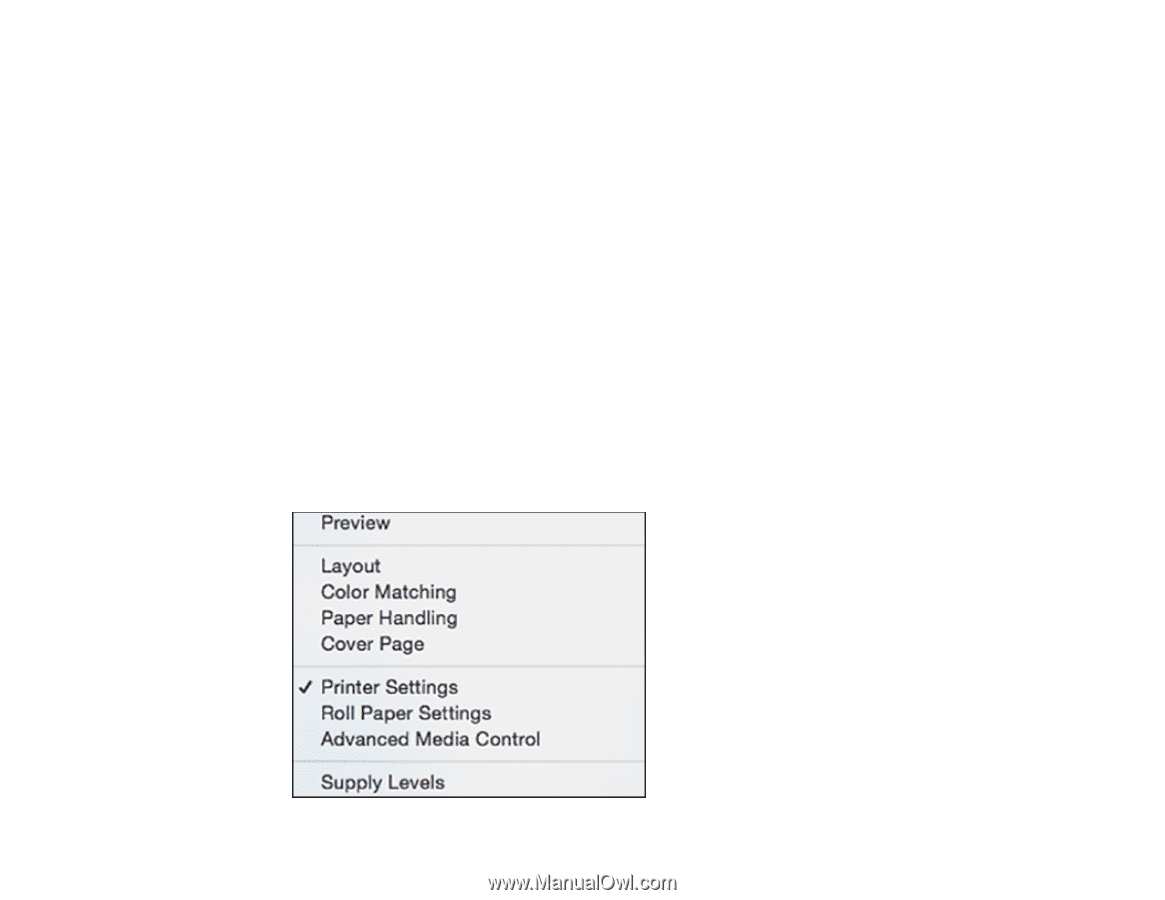
6. Select the size of the paper you loaded as the Paper Size setting. • To print a borderless photo, select the Borderless checkbox or a paper size with a Borderless option. You can also create a custom paper size, but the highest available Quality setting is limited to Normal. • To print on roll paper, select a roll paper size or one with a Borderless option. Note: For roll paper, make sure the maximum width of your photo is set to 17 inches to fit in the width of your roll paper (set the margins to 0 in your application software). • To print on paper loaded in the manual feed tray, select a paper size with a Front Fine Art option. Note: You can reduce or enlarge the size of the printed image by selecting Paper Handling from the pop-up menu and selecting a scaling option. Note: If you do not see these settings in the print window, check for them in your application before printing. They may be accessible by selecting Page Setup from the File menu. 7. Choose portrait or landscape as the Orientation setting. 8. Select any application-specific settings that appear on the screen, such as those shown in the image above for the Preview application. 9. Select Printer Settings from the pop-up menu. 111
-
 1
1 -
2
-
3
-
4
-
5
-
6
-
7
-
8
-
9
-
10
-
11
-
12
-
13
-
14
-
15
-
16
-
17
-
18
-
19
-
20
-
21
-
22
-
23
-
24
-
25
-
26
-
27
-
28
-
29
-
30
-
31
-
32
-
33
-
34
-
35
-
36
-
37
-
38
-
39
-
40
-
41
-
42
-
43
-
44
-
45
-
46
-
47
-
48
-
49
-
50
-
51
-
52
-
53
-
54
-
55
-
56
-
57
-
58
-
59
-
60
-
61
-
62
-
63
-
64
-
65
-
66
-
67
-
68
-
69
-
70
-
71
-
72
-
73
-
74
-
75
-
76
-
77
-
78
-
79
-
80
-
81
-
82
-
83
-
84
-
85
-
86
-
87
-
88
-
89
-
90
-
91
-
92
-
93
-
94
-
95
-
96
-
97
-
98
-
99
-
100
-
101
-
102
-
103
-
104
-
105
-
 106
106 -
 107
107 -
 108
108 -
 109
109 -
 110
110 -
 111
111 -
 112
112 -
 113
113 -
 114
114 -
 115
115 -
 116
116 -
117
-
118
-
119
-
120
-
121
-
122
-
123
-
124
-
125
-
126
-
127
-
128
-
129
-
130
-
131
-
132
-
133
-
134
-
135
-
136
-
137
-
138
-
139
-
140
-
141
-
142
-
143
-
144
-
145
-
146
-
147
-
148
-
149
-
150
-
151
-
152
-
153
-
154
-
155
-
156
-
157
-
158
-
159
-
160
-
161
-
162
-
163
-
164
-
165
-
166
-
167
-
168
-
169
-
170
-
171
-
172
-
173
-
174
-
175
-
176
-
177
-
178
-
179
-
180
-
181
-
182
-
183
-
184
-
185
-
186
-
187
-
188
-
189
-
190
-
191
-
192
-
193
-
194
-
195
-
196
-
197
-
198
-
199
-
200
-
201
-
202
-
203
-
204
-
205
-
206
-
207
-
208
-
209
 |
 |