Epson SureColor P800 Screen Print Edition User Manual - Page 29
Wi-Fi Direct Mode Setup, Proceed, Print, Parent topic, Related tasks
 |
View all Epson SureColor P800 Screen Print Edition manuals
Add to My Manuals
Save this manual to your list of manuals |
Page 29 highlights
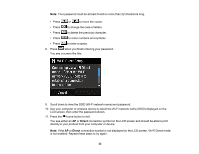
7. Press when you finish entering your password and select Proceed. 8. Confirm the displayed network settings and select OK to save them. Note: If you need to change a setting, press the back button. 9. If you want to print a network setup report, select Print. (Otherwise, select Done.) 10. Press the home button to exit. Your product should now be connected to the network. Note: If the WiFi connection symbol does not appear lit on the touch screen, you may have selected the wrong network name or entered the password incorrectly. Repeat these steps to try again. Parent topic: Wi-Fi Infrastructure Mode Setup Related tasks Changing a Wi-Fi Connection to a Wired Network Connection Wi-Fi Direct Mode Setup You can set up your product to communicate directly with your computer or another device without requiring a wireless router or access point. 1 Epson product 2 Computer with a wireless interface 29
-
 1
1 -
2
-
3
-
4
-
5
-
6
-
7
-
8
-
9
-
10
-
11
-
12
-
13
-
14
-
15
-
16
-
17
-
18
-
19
-
20
-
21
-
22
-
23
-
 24
24 -
 25
25 -
 26
26 -
 27
27 -
 28
28 -
 29
29 -
 30
30 -
 31
31 -
 32
32 -
 33
33 -
 34
34 -
35
-
36
-
37
-
38
-
39
-
40
-
41
-
42
-
43
-
44
-
45
-
46
-
47
-
48
-
49
-
50
-
51
-
52
-
53
-
54
-
55
-
56
-
57
-
58
-
59
-
60
-
61
-
62
-
63
-
64
-
65
-
66
-
67
-
68
-
69
-
70
-
71
-
72
-
73
-
74
-
75
-
76
-
77
-
78
-
79
-
80
-
81
-
82
-
83
-
84
-
85
-
86
-
87
-
88
-
89
-
90
-
91
-
92
-
93
-
94
-
95
-
96
-
97
-
98
-
99
-
100
-
101
-
102
-
103
-
104
-
105
-
106
-
107
-
108
-
109
-
110
-
111
-
112
-
113
-
114
-
115
-
116
-
117
-
118
-
119
-
120
-
121
-
122
-
123
-
124
-
125
-
126
-
127
-
128
-
129
-
130
-
131
-
132
-
133
-
134
-
135
-
136
-
137
-
138
-
139
-
140
-
141
-
142
-
143
-
144
-
145
-
146
-
147
-
148
-
149
-
150
-
151
-
152
-
153
-
154
-
155
-
156
-
157
-
158
-
159
-
160
-
161
-
162
-
163
-
164
-
165
-
166
-
167
-
168
-
169
-
170
-
171
-
172
-
173
-
174
-
175
-
176
-
177
-
178
-
179
-
180
-
181
-
182
-
183
-
184
-
185
-
186
-
187
-
188
-
189
-
190
-
191
-
192
-
193
-
194
-
195
-
196
-
197
-
198
-
199
-
200
-
201
-
202
-
203
-
204
-
205
-
206
-
207
-
208
-
209
 |
 |