Epson SureColor S30675 User Manual - Page 21
button media setup button, Display, Menu button, button back button
 |
View all Epson SureColor S30675 manuals
Add to My Manuals
Save this manual to your list of manuals |
Page 21 highlights
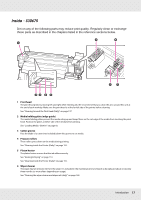
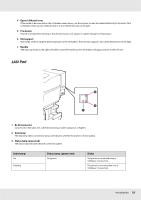
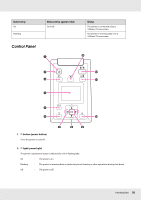
3 M button (media setup button) Press this button to display the Media Setup menu, which contains such items as Media Remaining, Select Media, Customize Settings, and Print Media List. This button is disabled during printing. See "The Media Setup Menu" on page 203. 4 Display Displays the printer's status, menus, error messages, and so on. See "Understanding the Display" on page 22. 5 Menu button Press this button to display menus. See "Using the Control Panel Menu" on page 198. 6 y button (back button) Press this button to exit to the previous menu when options are displayed. See "Menu Operations" on page 198. 7 l/r buttons (left and right arrow buttons) Use to position the cursor when performing such tasks as entering a Setting Name or IP Address in the setup menu. 8 u/d buttons (media feed buttons) When the media loading lever is in a lowered position and the d button is pressed, media is fed. If the u button is pressed, media is rewound. This occurs regardless of the way the loaded media is rolled. Press and hold the d button while at an adjustment, check pattern, or media feed screen to feed the media the maximum length (103 cm [40.6 in]) into the printer. Keep the u button pressed to rewind the media up to 25 cm (9.8 in.). Note that when the u button is used to rewind, the media will stop when its edge reaches the starting print position. Rewind can be resumed by releasing the button and then pressing it again. When the media loading lever in a raised position, the button to rewind media depends on how the loaded media is rolled. Printable Side Out: Press the u button. Printable Side In: Press the d button. Keep the button pressed to rewind the media up to 25 cm (9.8 in.). When the menus are displayed, these buttons can be used to select menu items and options. See "Menu Operations" on page 198. 9 OK button Pressing this button when a menu item is highlighted displays options for the selected item. Pressing this button when an option is highlighted selects the highlighted item or performs the selected operation. When an alarm sounds, press the button to turn off the alarm. Introduction 21
-
 1
1 -
2
-
3
-
4
-
5
-
6
-
7
-
8
-
9
-
10
-
11
-
12
-
13
-
14
-
15
-
 16
16 -
 17
17 -
 18
18 -
 19
19 -
 20
20 -
 21
21 -
 22
22 -
 23
23 -
 24
24 -
 25
25 -
 26
26 -
27
-
28
-
29
-
30
-
31
-
32
-
33
-
34
-
35
-
36
-
37
-
38
-
39
-
40
-
41
-
42
-
43
-
44
-
45
-
46
-
47
-
48
-
49
-
50
-
51
-
52
-
53
-
54
-
55
-
56
-
57
-
58
-
59
-
60
-
61
-
62
-
63
-
64
-
65
-
66
-
67
-
68
-
69
-
70
-
71
-
72
-
73
-
74
-
75
-
76
-
77
-
78
-
79
-
80
-
81
-
82
-
83
-
84
-
85
-
86
-
87
-
88
-
89
-
90
-
91
-
92
-
93
-
94
-
95
-
96
-
97
-
98
-
99
-
100
-
101
-
102
-
103
-
104
-
105
-
106
-
107
-
108
-
109
-
110
-
111
-
112
-
113
-
114
-
115
-
116
-
117
-
118
-
119
-
120
-
121
-
122
-
123
-
124
-
125
-
126
-
127
-
128
-
129
-
130
-
131
-
132
-
133
-
134
-
135
-
136
-
137
-
138
-
139
-
140
-
141
-
142
-
143
-
144
-
145
-
146
-
147
-
148
-
149
-
150
-
151
-
152
-
153
-
154
-
155
-
156
-
157
-
158
-
159
-
160
-
161
-
162
-
163
-
164
-
165
-
166
-
167
-
168
-
169
-
170
-
171
-
172
-
173
-
174
-
175
-
176
-
177
-
178
-
179
-
180
-
181
-
182
-
183
-
184
-
185
-
186
-
187
-
188
-
189
-
190
-
191
-
192
-
193
-
194
-
195
-
196
-
197
-
198
-
199
-
200
-
201
-
202
-
203
-
204
-
205
-
206
-
207
-
208
-
209
-
210
-
211
-
212
-
213
-
214
-
215
-
216
-
217
-
218
-
219
-
220
-
221
-
222
-
223
-
224
-
225
-
226
-
227
-
228
-
229
-
230
-
231
-
232
-
233
-
234
-
235
-
236
-
237
-
238
-
239
-
240
-
241
-
242
-
243
-
244
-
245
-
246
-
247
-
248
-
249
-
250
-
251
-
252
-
253
-
254
-
255
 |
 |
