Epson SureColor S30675 User Manual - Page 87
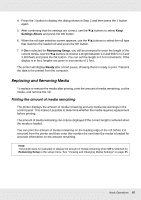
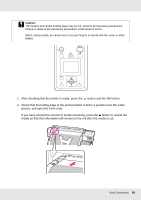
Replacing and Removing Media, Printing the amount of media remaining
 |
View all Epson SureColor S30675 manuals
Add to My Manuals
Save this manual to your list of manuals |
Page 87 highlights
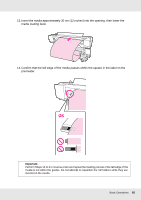
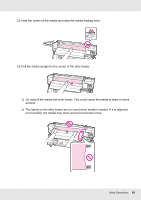
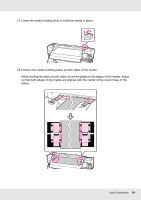
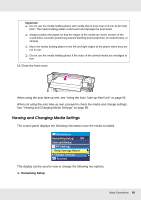
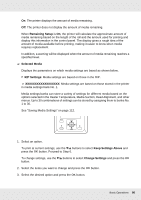
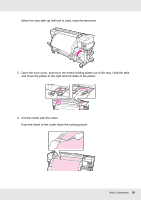
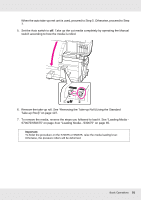
4. Press the y button to display the dialog shown in Step 2 and then press the y button again. 5. After confirming that the settings are correct, use the d/u buttons to select Keep Settings Above and press the Z button. 6. When the roll type selection screen appears, use the d/u buttons to select the roll type that matches the loaded roll and press the Z button. 7. If On is selected for Remaining Setup, you will be prompted to enter the length of the current media. Use the d/u buttons to choose a length between 1.0 and 999.5 m (3 and 3,300 feet) and press the Z button. You can set the length in 0.5 m increments. If the display is in feet, lengths are given in increments of 1 foot. The printer will display Ready after a brief pause, showing that it is ready to print. Transmit the data to be printed from the computer. Replacing and Removing Media To replace or remove the media after printing, print the amount of media remaining, cut the media, and remove the roll. Printing the amount of media remaining The printer displays the amount of media remaining and any media low warnings in the control panel. This makes it possible to determine whether the media requires replacement before printing. The amount of media remaining can only be displayed if the correct length is entered when the media is loaded. You can print the amount of media remaining on the leading edge of the roll before it is removed from the printer and then enter this number the next time the media is loaded for accurate information on the amount remaining. Note: The printer does not calculate or display the amount of media remaining when Off is selected for Remaining Setup in the setup menu. See "Viewing and Changing Media Settings" on page 85. Basic Operations 87
-
 1
1 -
2
-
3
-
4
-
5
-
6
-
7
-
8
-
9
-
10
-
11
-
12
-
13
-
14
-
15
-
16
-
17
-
18
-
19
-
20
-
21
-
22
-
23
-
24
-
25
-
26
-
27
-
28
-
29
-
30
-
31
-
32
-
33
-
34
-
35
-
36
-
37
-
38
-
39
-
40
-
41
-
42
-
43
-
44
-
45
-
46
-
47
-
48
-
49
-
50
-
51
-
52
-
53
-
54
-
55
-
56
-
57
-
58
-
59
-
60
-
61
-
62
-
63
-
64
-
65
-
66
-
67
-
68
-
69
-
70
-
71
-
72
-
73
-
74
-
75
-
76
-
77
-
78
-
79
-
80
-
81
-
 82
82 -
 83
83 -
 84
84 -
 85
85 -
 86
86 -
 87
87 -
 88
88 -
 89
89 -
 90
90 -
 91
91 -
 92
92 -
93
-
94
-
95
-
96
-
97
-
98
-
99
-
100
-
101
-
102
-
103
-
104
-
105
-
106
-
107
-
108
-
109
-
110
-
111
-
112
-
113
-
114
-
115
-
116
-
117
-
118
-
119
-
120
-
121
-
122
-
123
-
124
-
125
-
126
-
127
-
128
-
129
-
130
-
131
-
132
-
133
-
134
-
135
-
136
-
137
-
138
-
139
-
140
-
141
-
142
-
143
-
144
-
145
-
146
-
147
-
148
-
149
-
150
-
151
-
152
-
153
-
154
-
155
-
156
-
157
-
158
-
159
-
160
-
161
-
162
-
163
-
164
-
165
-
166
-
167
-
168
-
169
-
170
-
171
-
172
-
173
-
174
-
175
-
176
-
177
-
178
-
179
-
180
-
181
-
182
-
183
-
184
-
185
-
186
-
187
-
188
-
189
-
190
-
191
-
192
-
193
-
194
-
195
-
196
-
197
-
198
-
199
-
200
-
201
-
202
-
203
-
204
-
205
-
206
-
207
-
208
-
209
-
210
-
211
-
212
-
213
-
214
-
215
-
216
-
217
-
218
-
219
-
220
-
221
-
222
-
223
-
224
-
225
-
226
-
227
-
228
-
229
-
230
-
231
-
232
-
233
-
234
-
235
-
236
-
237
-
238
-
239
-
240
-
241
-
242
-
243
-
244
-
245
-
246
-
247
-
248
-
249
-
250
-
251
-
252
-
253
-
254
-
255
 |
 |
