Epson SureColor S50670 Quick Reference Guide - Page 29
Washing the Ink System, Cleaning the Print Head, Wiper, Caps, and Wiper Rail
 |
View all Epson SureColor S50670 manuals
Add to My Manuals
Save this manual to your list of manuals |
Page 29 highlights
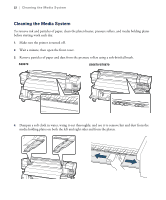
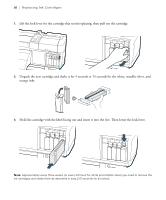
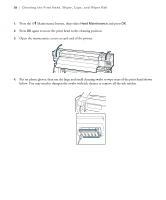
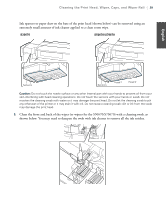
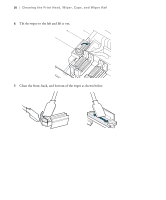
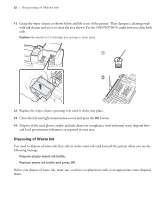
English Washing the Ink System | 27 Washing the Ink System If you cannot recover nozzles by running the heaviest cleaning cycle, you need to wash the print head. This involves removing ink cartridges, installing cleaning cartridges, and then reinstalling ink cartridges. The washing process also requires you to empty the waste ink tank several times. Because of the amount of ink consumed, you should not perform head washing unless you cannot recover nozzles through normal head cleaning. 1. Press the # Maintenance button. 2. Select Head Washing and press OK. 3. Select individual nozzle arrays or All Nozzles. 4. Follow all instructions on the LCD display. For detailed instructions, see these sections: • Removing and inserting ink cartridges and cleaning cartridges (see page 25) • Emptying the waste ink tank (see page 32) Cleaning the Print Head, Wiper, Caps, and Wiper Rail Clean the print head, wiper, caps, and wiper rail at least once a week. You may need to clean them more often if you notice blurred ink or gaps in your prints after cleaning the print head. In addition to the maintenance kit that came with the printer, you will need protective eyewear, ink cleaner, a clean room wipe (lint-free disposable cleaning cloth), and a metal or plastic tray (to hold parts that have been removed for cleaning or replacement). Note: If you need more maintenance kit supplies, you can order an Additional Printer Maintenance Kit. See page 37 for ordering information. Caution: To clean ink stains that cannot be removed with cleaning swabs alone, apply ink cleaner to a swab. Ink cleaner should be used only to clean the area around the wiper, caps, and print head. Used ink cleaner should be disposed of in the same way as used ink. Caution: You must complete this cleaning process within 10 minutes to prevent the print head from drying out.
-
 1
1 -
2
-
3
-
4
-
5
-
6
-
7
-
8
-
9
-
10
-
11
-
12
-
13
-
14
-
15
-
16
-
17
-
18
-
19
-
20
-
21
-
22
-
23
-
 24
24 -
 25
25 -
 26
26 -
 27
27 -
 28
28 -
 29
29 -
 30
30 -
 31
31 -
 32
32 -
 33
33 -
 34
34 -
35
-
36
-
37
-
38
-
39
-
40
-
41
-
42
-
43
-
44
-
45
-
46
-
47
-
48
-
49
-
50
-
51
-
52
-
53
-
54
-
55
-
56
-
57
-
58
-
59
-
60
-
61
-
62
-
63
-
64
-
65
-
66
-
67
-
68
-
69
-
70
-
71
-
72
-
73
-
74
-
75
-
76
-
77
-
78
-
79
-
80
-
81
-
82
-
83
-
84
-
85
-
86
-
87
-
88
-
89
-
90
-
91
-
92
-
93
-
94
-
95
-
96
-
97
-
98
-
99
-
100
-
101
-
102
-
103
-
104
-
105
-
106
-
107
-
108
-
109
-
110
-
111
-
112
-
113
-
114
-
115
-
116
-
117
-
118
 |
 |
