Epson SureColor S50670 Quick Reference Guide - Page 38
Close the right maintenance cover., then press
 |
View all Epson SureColor S50670 manuals
Add to My Manuals
Save this manual to your list of manuals |
Page 38 highlights
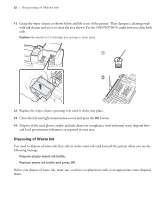
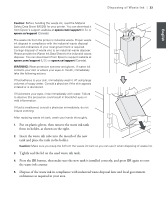
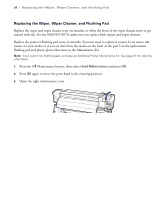
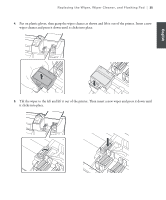
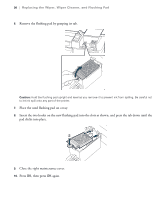
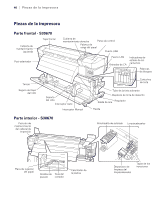
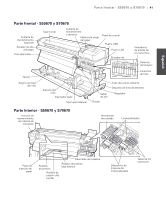
36 | Replacing the Wiper, Wiper Cleaner, and Flushing Pad 6. Remove the flushing pad by grasping its tab. Caution: Hold the flushing pad upright and level as you remove it to prevent ink from spilling. Be careful not to let ink spill onto any part of the printer. 7. Place the used flushing pad on a tray. 8. Insert the two hooks on the new flushing pad into the slots as shown, and press the tab down until the pad clicks into place. 9. Close the right maintenance cover. 10. Press OK, then press OK again.
-
 1
1 -
2
-
3
-
4
-
5
-
6
-
7
-
8
-
9
-
10
-
11
-
12
-
13
-
14
-
15
-
16
-
17
-
18
-
19
-
20
-
21
-
22
-
23
-
24
-
25
-
26
-
27
-
28
-
29
-
30
-
31
-
32
-
 33
33 -
 34
34 -
 35
35 -
 36
36 -
 37
37 -
 38
38 -
 39
39 -
 40
40 -
 41
41 -
 42
42 -
 43
43 -
44
-
45
-
46
-
47
-
48
-
49
-
50
-
51
-
52
-
53
-
54
-
55
-
56
-
57
-
58
-
59
-
60
-
61
-
62
-
63
-
64
-
65
-
66
-
67
-
68
-
69
-
70
-
71
-
72
-
73
-
74
-
75
-
76
-
77
-
78
-
79
-
80
-
81
-
82
-
83
-
84
-
85
-
86
-
87
-
88
-
89
-
90
-
91
-
92
-
93
-
94
-
95
-
96
-
97
-
98
-
99
-
100
-
101
-
102
-
103
-
104
-
105
-
106
-
107
-
108
-
109
-
110
-
111
-
112
-
113
-
114
-
115
-
116
-
117
-
118
 |
 |
36
|
Replacing the Wiper, Wiper Cleaner, and Flushing Pad
6.
Remove the flushing pad by grasping its tab.
Caution:
Hold the flushing pad upright and level as you remove it to prevent ink from spilling. Be careful not
to let ink spill onto any part of the printer.
7.
Place the used flushing pad on a tray.
8.
Insert the two hooks on the new flushing pad into the slots as shown, and press the tab down until the
pad clicks into place.
9.
Close the right maintenance cover.
10.
Press
OK
, then press
OK
again.