Epson XP-300 User Guide - Page 122
Selecting Print Settings for Photos Displayed on the LCD Screen, Viewing and Printing Photos
 |
View all Epson XP-300 manuals
Add to My Manuals
Save this manual to your list of manuals |
Page 122 highlights
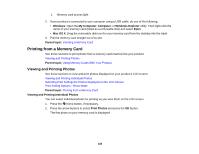
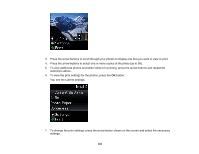
8. When you are ready to print, press the start button. Note: To cancel printing, press the stop button. Parent topic: Viewing and Printing Photos Related tasks Selecting Print Settings for Photos Displayed on the LCD Screen Selecting Print Settings for Photos Displayed on the LCD Screen You can change the settings used for printing photos displayed on the LCD screen. 1. Press the arrow button shown on the screen displaying the current print settings. You see this screen: 2. Do the following as necessary to select settings: • To change the selected option for the current print setting, press the left or right arrow button and select the option you want. • To select a different print setting, press the up or down arrow button, select the setting you want, and press the left or right arrow button to select the option you want for the setting. 3. When you finish selecting settings, press the OK button. Parent topic: Viewing and Printing Photos Related references Print Setting Options - Photo Mode 122
-
 1
1 -
2
-
3
-
4
-
5
-
6
-
7
-
8
-
9
-
10
-
11
-
12
-
13
-
14
-
15
-
16
-
17
-
18
-
19
-
20
-
21
-
22
-
23
-
24
-
25
-
26
-
27
-
28
-
29
-
30
-
31
-
32
-
33
-
34
-
35
-
36
-
37
-
38
-
39
-
40
-
41
-
42
-
43
-
44
-
45
-
46
-
47
-
48
-
49
-
50
-
51
-
52
-
53
-
54
-
55
-
56
-
57
-
58
-
59
-
60
-
61
-
62
-
63
-
64
-
65
-
66
-
67
-
68
-
69
-
70
-
71
-
72
-
73
-
74
-
75
-
76
-
77
-
78
-
79
-
80
-
81
-
82
-
83
-
84
-
85
-
86
-
87
-
88
-
89
-
90
-
91
-
92
-
93
-
94
-
95
-
96
-
97
-
98
-
99
-
100
-
101
-
102
-
103
-
104
-
105
-
106
-
107
-
108
-
109
-
110
-
111
-
112
-
113
-
114
-
115
-
116
-
 117
117 -
 118
118 -
 119
119 -
 120
120 -
 121
121 -
 122
122 -
 123
123 -
 124
124 -
 125
125 -
 126
126 -
 127
127 -
128
-
129
-
130
-
131
-
132
-
133
-
134
-
135
-
136
-
137
-
138
-
139
-
140
-
141
-
142
-
143
-
144
-
145
-
146
-
147
-
148
-
149
-
150
-
151
-
152
-
153
-
154
-
155
-
156
-
157
-
158
-
159
-
160
-
161
-
162
-
163
-
164
-
165
-
166
-
167
-
168
-
169
-
170
-
171
-
172
-
173
-
174
-
175
-
176
-
177
-
178
-
179
-
180
-
181
-
182
-
183
-
184
-
185
-
186
-
187
-
188
-
189
-
190
-
191
-
192
-
193
-
194
-
195
-
196
-
197
-
198
-
199
-
200
-
201
-
202
-
203
-
204
-
205
-
206
-
207
-
208
-
209
-
210
-
211
-
212
 |
 |