Esoteric G-02X Owners Manual EN FR SP - Page 10
Basic operation, When setting 10MHz OUT connectors
 |
View all Esoteric G-02X manuals
Add to My Manuals
Save this manual to your list of manuals |
Page 10 highlights
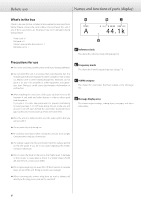
Basic operation 2) Use the A and B buttons to set the frequencies sent to connected devices (page 11). 13 34 2 1 Press the POWER button to turn the unit on. The power indicator lights blue. oo When the power is turned on, the unit starts warming the crystal oscillator (OCXO) up to its operating temperature. It takes two minutes for the oscillator frequency to stabilize. VVWhen you do not plan to use the unit for an extended amount of time, turn the preheat (PrHEAT) setting OFF and press the POWER button to turn the unit off. When setting 10MHz OUT connectors Press the 10MHz button to turn output on and off. Use the menu to set which 10MHz OUT connectors (1-4) to use (page 16). oo If you do nothing for five or more seconds, setting mode will end and ordinary display will resume. (If DISP is set to SHORT, this will happen after three seconds.) 2 Make clock output settings. When using the CLOCK OUT connectors 1) Set the clock reference frequency to 44.1 or 48 kHz. Press the MENU button to open the FREQ menu and use the A and B buttons to set the frequency mode (pages 14-15). 44 (44.1 kHz) Use for playback of CDs, Super Audio CDs and other 44.1kHz sources. 48 (48 kHz) Use for playback of DVDs, DATs and other 48kHz sources. (Some DVDs and DATs are recorded at 44.1 kHz. In this case, use the 44.1kHz setting.) 3 On the connected devices, turn clock sync ON (or set to slave mode). Read the owner's manual for each device for instructions on how to set their clock sync status properly. If you connect this unit to devices from other manufacturers, be sure to read the manuals of those devices to confirm the clock frequencies that they can receive. Some devices require the clock frequency to be set to the same value as the audio signal sampling frequency. Some dual AES connections might require that the clock frequency be set to half of the audio signal frequency. oo Due to the nature of the crystal oscillator (OCXO), continuous operation stabilizes the precision of operation, so we recommend turning the preheat (PrHEAT) setting ON (page 16). oo Settings are retained even when the power is turned off. oo Once settings have been made, those settings can be used when the power is turned on again. Set the frequency mode according to the type of disc to be played or device being used (page 15). oo When using only universal clock (100 kHz or 10 MHz), either setting is fine. oo Only use 44EXP or 48EXP for frequencies that are not covered by the 44 and 48 modes (page 15). 10
-
 1
1 -
2
-
3
-
4
-
 5
5 -
 6
6 -
 7
7 -
 8
8 -
 9
9 -
 10
10 -
 11
11 -
 12
12 -
 13
13 -
 14
14 -
 15
15 -
16
-
17
-
18
-
19
-
20
-
21
-
22
-
23
-
24
-
25
-
26
-
27
-
28
-
29
-
30
-
31
-
32
-
33
-
34
-
35
-
36
-
37
-
38
-
39
-
40
-
41
-
42
-
43
-
44
-
45
-
46
-
47
-
48
-
49
-
50
-
51
-
52
-
53
-
54
-
55
-
56
-
57
-
58
-
59
-
60
 |
 |
