Esoteric G-02X Owners Manual EN FR SP - Page 11
Clock output frequency setting, Setting A and B outputs by pair default, Setting A1, A2, B1 or B2
 |
View all Esoteric G-02X manuals
Add to My Manuals
Save this manual to your list of manuals |
Page 11 highlights
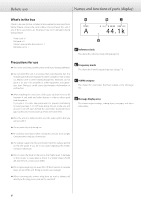
English Clock output frequency setting You can set the clock frequency output from the CLOCK OUT connectors. oo This unit has 2 pairs (A and B) of clock outputs that can be separated further into 4 individual outputs (A1, A2, B1 and B2). You can set the clock frequency independently for each of these outputs. Setting A1, A2, B1 or B2 Press the A button for at least two seconds until "A2>" appears. Then, press the A button to change the A2 setting. You can set different clock frequencies for A1 and A2. Follow the same procedure for B. Setting A1 or B1 oo By default, the A and B outputs are set to be used as pairs. Setting A and B outputs by pair (default) When you change the A setting, the output frequency is set for both A1 and A2 simultaneously. Follow the same procedure for B. When A2 is set to any value that is not the same as the A1 setting, when "A1>" appears, press the A button to change just the A1 output frequency. Follow the same procedure for B. When "A >" or "B >" appears, pressing the A or B button changes the output frequency of that pair. Press repeatedly to cycle through the options. oo Press and hold the A or B button for at least two seconds to set A2 or B2, respectively (See "Setting A2 or B2"). oo If you do nothing for ten or more seconds, setting mode will end and ordinary display will resume. (If DISP is set to SHORT, this will happen after three seconds.) Setting A2 or B2 Press the A or B button for at least two seconds to set A2 or B2. When "A2>" appears, press the A button to change just the A2 output frequency. Follow the same procedure for B. oo To set A1 after setting A2, press the A button again after returning to the ordinary display. oo If you set A2 to the same value as A1, "A" will appear again, and you can set the output frequency used by both outputs in the A pair simultaneously. Follow the same procedure for B (See "Setting A and B outputs by pair (default)"). 11
-
 1
1 -
2
-
3
-
4
-
5
-
 6
6 -
 7
7 -
 8
8 -
 9
9 -
 10
10 -
 11
11 -
 12
12 -
 13
13 -
 14
14 -
 15
15 -
 16
16 -
17
-
18
-
19
-
20
-
21
-
22
-
23
-
24
-
25
-
26
-
27
-
28
-
29
-
30
-
31
-
32
-
33
-
34
-
35
-
36
-
37
-
38
-
39
-
40
-
41
-
42
-
43
-
44
-
45
-
46
-
47
-
48
-
49
-
50
-
51
-
52
-
53
-
54
-
55
-
56
-
57
-
58
-
59
-
60
 |
 |
