Esoteric G-02X Owners Manual EN FR SP - Page 9
CLOCK OUT connectors, Power inlet ~IN
 |
View all Esoteric G-02X manuals
Add to My Manuals
Save this manual to your list of manuals |
Page 9 highlights
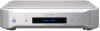
English A 10MHz OUT connectors (1-4) These output 10MHz clock signals (sine wave, 0.5Vrms output level, 50Ω output impedance). Connect these 10MHz OUT connectors to the clock input connectors of CD players, D/A converters and other digital devices that support 10MHz input. oo Use the 10MHz button and the 10MHz OUT connector 1-4 output settings to set the 10MHz OUT connectors (pages 10 and 16). E Power inlet (~IN) Connect the included power cord to this socket. After completing all other connections, plug the power plug into a power outlet. VVUse only a genuine Esoteric power cord. Use of other power cords could result in fire or electric shock. VVDisconnect the power plug from the outlet if you will not use the unit for a long time. B Reference frequency input (EXT IN) connector To input a signal from an external reference signal generator (10MHz output) or GPS receiver (10MHz output), connect the output connector of that device to this EXT IN connector and change the reference clock setting (page 16). oo If the output level of the external oscillator is outside the allowable input range of this unit, it cannot be used. Refer to the oscillator manual for information on the output level and accuracy of the oscillator. Use a commercially-available BNC coaxial cable with 50Ω or 75Ω impedance for each connector. At Esoteric, we use Esoteric MEXCEL stressfree cables for reference. For detailed information, access the following website. http://www.esoteric.jp/products/esoteric/accessory/indexe.html C CLOCK OUT connectors These output clock signals (square wave, TTL level, 75Ω output impedance). Connect these CLOCK OUT connectors to the clock input connectors of CD players, D/A converters and other digital devices. oo Use the A and B buttons on the front panel to change their frequencies (page 11). oo Use the frequency mode setting (FREQ) to set the clock reference frequency (page 15). D SIGNAL GND grounding terminal Connecting this to the grounding terminal of a connected digital device, amplifier or other equipment might improve the audio quality. oo This is not an electrical safety ground. 9
-
 1
1 -
2
-
3
-
 4
4 -
 5
5 -
 6
6 -
 7
7 -
 8
8 -
 9
9 -
 10
10 -
 11
11 -
 12
12 -
 13
13 -
 14
14 -
15
-
16
-
17
-
18
-
19
-
20
-
21
-
22
-
23
-
24
-
25
-
26
-
27
-
28
-
29
-
30
-
31
-
32
-
33
-
34
-
35
-
36
-
37
-
38
-
39
-
40
-
41
-
42
-
43
-
44
-
45
-
46
-
47
-
48
-
49
-
50
-
51
-
52
-
53
-
54
-
55
-
56
-
57
-
58
-
59
-
60
 |
 |
