Foxconn Z77A-S User manual - Page 73
BIOS Configuration, 5-6 Create RAID in BIOS, 1. Enter RAID BIOS Setup - corporation
 |
View all Foxconn Z77A-S manuals
Add to My Manuals
Save this manual to your list of manuals |
Page 73 highlights
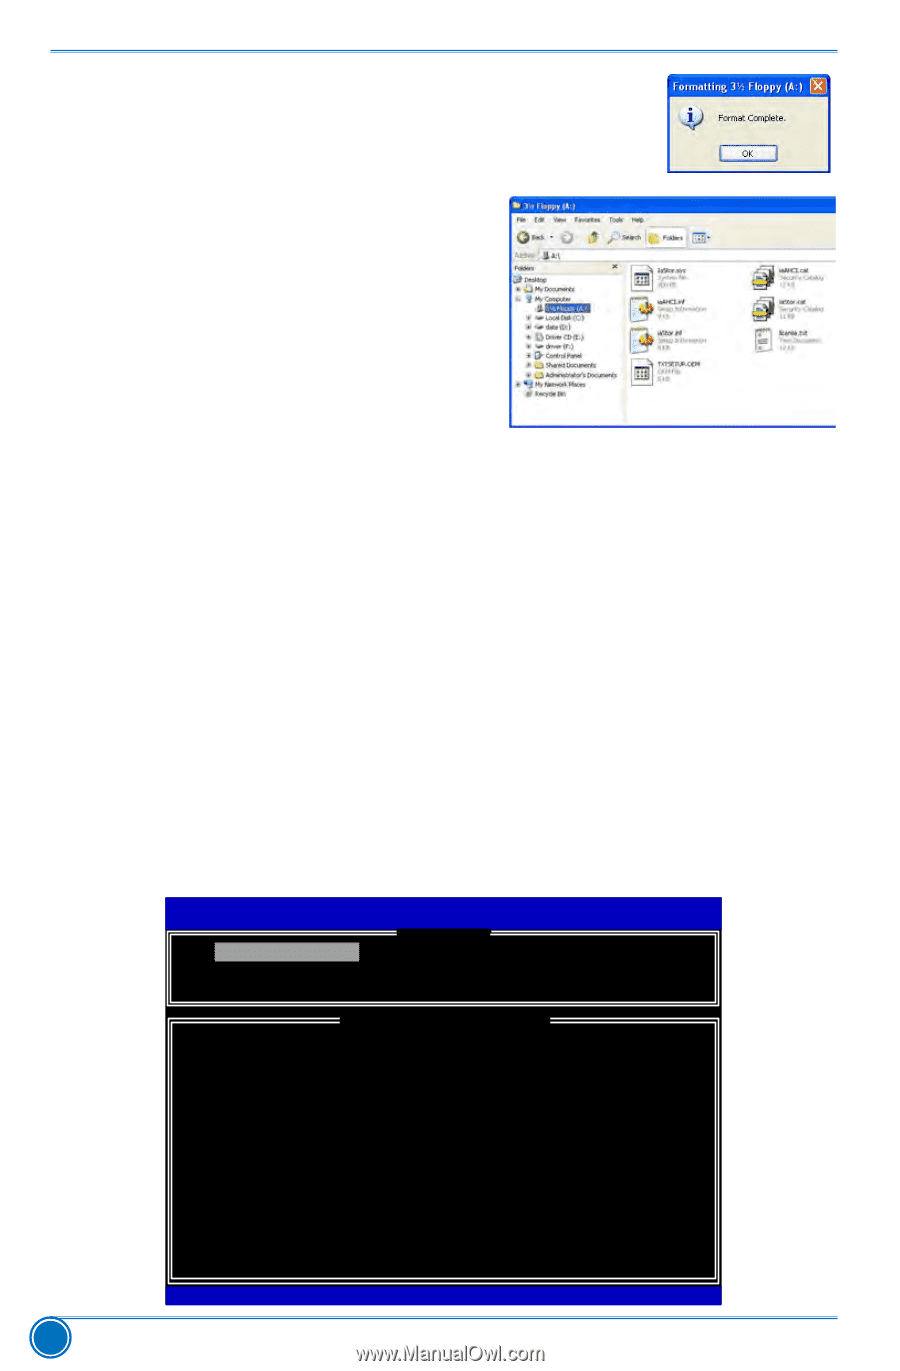
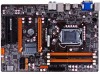
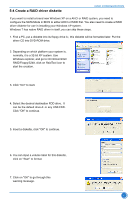
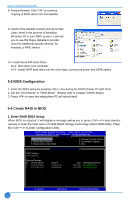
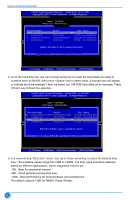
RAID CONFIGURATION 8. Format finished. Click "OK" to continue copying of RAID driver into this diskette. 9. Check if the diskette contains the driver files. Later, when in the process of installing Windows XP in your RAID system, it will ask you to use this floppy diskette to provide driver for additional specific devices, for example, a RAID device. 10. Install Serial ATA Hard Disks : 10-1. Shut down your computer. 10-2. Install SATA hard disks into the drive bays, connect all power and SATA cables. 5-5 BIOS Configuration 1. Enter the BIOS setup by pressing key during the POST(Power On Self Test). 2. Set the "SATA Mode" to "RAID Mode". (Please refer to Chapter 3 BIOS Setup) 3. Press to save the setting then PC will reboot itself. 5-6 Create RAID in BIOS 1. Enter RAID BIOS Setup When BIOS is restarted, it will display a message asking you to press + keys simultaneously to enter the main menu of Intel® Rapid Storage Technology Option ROM Utility. Press the + to enter Configuration Utility. Intel(RIn)teMl(aRtr)ixRSaptoidraSgteorMaagneaTgeecrhonpotlioognyR-OUMpvti5o.n0.R0.O1M011- 1IC1.H0.90R.1w3369AID5 Copyright(C) 2003-1014 IInntteell CCoorrppoorraattiioonn. A lAl lRl RigihgthstsRReseesrevrevde.d. [ MAIN MENU ] 11.. CCrreeaattee RRAAIIDD VVoolluummee 4. Recover Volume Options 2. Delete RAID Volume 5. Acceleration Options 3. Reset Disks to Non-RAID 6. Exit [ DISK/VOLUME INFORMATION ] RAID Volume : None Defined. Physical Devices: ID Device Model 0 ST3320418AS 1 ST3160815AS Serial # 9VM8Y4D8 5RX4M04N Size Type/Status(Vol ID) 298.0GB Non-RAID Disk 149.0GB Non-RAID Disk Select ESC]-Exit ENTER]-Select Menu 66
-
 1
1 -
2
-
3
-
4
-
5
-
6
-
7
-
8
-
9
-
10
-
11
-
12
-
13
-
14
-
15
-
16
-
17
-
18
-
19
-
20
-
21
-
22
-
23
-
24
-
25
-
26
-
27
-
28
-
29
-
30
-
31
-
32
-
33
-
34
-
35
-
36
-
37
-
38
-
39
-
40
-
41
-
42
-
43
-
44
-
45
-
46
-
47
-
48
-
49
-
50
-
51
-
52
-
53
-
54
-
55
-
56
-
57
-
58
-
59
-
60
-
61
-
62
-
63
-
64
-
65
-
66
-
67
-
 68
68 -
 69
69 -
 70
70 -
 71
71 -
 72
72 -
 73
73 -
 74
74 -
 75
75 -
 76
76 -
 77
77 -
 78
78 -
79
-
80
-
81
-
82
-
83
-
84
-
85
-
86
-
87
-
88
-
89
-
90
-
91
-
92
-
93
-
94
-
95
-
96
-
97
-
98
-
99
-
100
-
101
-
102
-
103
-
104
-
105
-
106
-
107
-
108
 |
 |