Gigabyte M1305 Manual - Page 28
Optical disc drive
 |
View all Gigabyte M1305 manuals
Add to My Manuals
Save this manual to your list of manuals |
Page 28 highlights
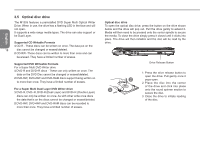
English 3.5 Optical disc drive The M1305 features a preinstalled DVD Super Multi Optical Writer Drive. When in use, the drive has a flashing LED in the face and will not open. It supports a wide range media types. The drive can also support or be Dual Layer. Supported CD Writable Formats 1 CD-R - These discs can be written on once. The data put on the 18 disc cannot be changed or erased/deleted. 2 CD-RW -These discs can be written to more than once and can be erased. They have a limited number of erases. Supported DVD Writeable Formats For a Super Multi DVD Writer drive 1 DVD-R and DVD+R discs - These can only written on once. The data on the DVD Disc cannot be changed or erased/deleted. 2 DVD-RW, DVD+RW and DVD-RAM discs support being written on to more than once. They have a limited number of erases. For a Super Multi Dual Layer DVD Writer drive 1 DVD-R, DVD+R, DVD-R (Dual Layer) and DVD+R (Double Layer) discs can only be written on once. As with other write once discs the data that is on the discs cannot be changed or erased/deleted. 2 DVD-RW, DVD+RW and DVD-RAM discs can be recorded to more than once. They have a limited number of erases. Optical disc drive To open the optical disc drive, press the button on the drive shown below and the drive will pop out. Pull the drive gently to extend it. Media will then need to be pressed onto the center spindle to secure the media. To close the drive simply press it closed until it clicks into place. The drive will then initialize and the disc will be read by the drive. Drive Release Button 1. Press the drive release button to open the drive. Pull gently once it 2 pops open. 2. Place the disc into the center of the drive and click into place 1 onto the round spinner section to secure the disc. 3. Close the drive to initiate reading of the disc.
-
 1
1 -
2
-
3
-
4
-
5
-
6
-
7
-
8
-
9
-
10
-
11
-
12
-
13
-
14
-
15
-
16
-
17
-
18
-
19
-
20
-
21
-
22
-
 23
23 -
 24
24 -
 25
25 -
 26
26 -
 27
27 -
 28
28 -
 29
29 -
 30
30 -
 31
31 -
 32
32 -
 33
33 -
34
-
35
-
36
-
37
-
38
-
39
-
40
-
41
-
42
-
43
-
44
-
45
-
46
-
47
-
48
-
49
-
50
-
51
-
52
-
53
-
54
-
55
-
56
-
57
-
58
-
59
-
60
-
61
-
62
-
63
-
64
 |
 |
