HTC TyTN II User Manual - Page 27
Installing a Storage Card, 1.4 Starting Up, Turn your device on and off
 |
UPC - 821793001438
View all HTC TyTN II manuals
Add to My Manuals
Save this manual to your list of manuals |
Page 27 highlights
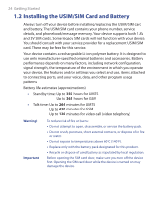
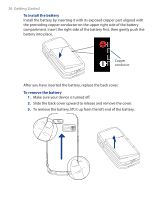
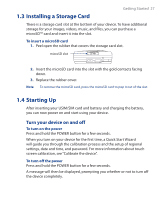
1.3 Installing a Storage Card Getting Started 27 There is a storage card slot at the bottom of your device. To have additional storage for your images, videos, music, and files, you can purchase a microSDTM card and insert it into the slot. To insert a microSD card 1. Peel open the rubber that covers the storage card slot. microSD slot 2. Insert the microSD card into the slot with the gold contacts facing down. 3. Replace the rubber cover. Note To remove the microSD card, press the microSD card to pop it out of the slot. 1.4 Starting Up After inserting your USIM/SIM card and battery and charging the battery, you can now power on and start using your device. Turn your device on and off To turn on the power Press and hold the POWER button for a few seconds. When you turn on your device for the first time, a Quick Start Wizard will guide you through the calibration process and the setup of regional settings, date and time, and password. For more information about touch screen calibration, see "Calibrate the device". To turn off the power Press and hold the POWER button for a few seconds. A message will then be displayed, prompting you whether or not to turn off the device completely.
-
 1
1 -
2
-
3
-
4
-
5
-
6
-
7
-
8
-
9
-
10
-
11
-
12
-
13
-
14
-
15
-
16
-
17
-
18
-
19
-
20
-
21
-
 22
22 -
 23
23 -
 24
24 -
 25
25 -
 26
26 -
 27
27 -
 28
28 -
 29
29 -
 30
30 -
 31
31 -
 32
32 -
33
-
34
-
35
-
36
-
37
-
38
-
39
-
40
-
41
-
42
-
43
-
44
-
45
-
46
-
47
-
48
-
49
-
50
-
51
-
52
-
53
-
54
-
55
-
56
-
57
-
58
-
59
-
60
-
61
-
62
-
63
-
64
-
65
-
66
-
67
-
68
-
69
-
70
-
71
-
72
-
73
-
74
-
75
-
76
-
77
-
78
-
79
-
80
-
81
-
82
-
83
-
84
-
85
-
86
-
87
-
88
-
89
-
90
-
91
-
92
-
93
-
94
-
95
-
96
-
97
-
98
-
99
-
100
-
101
-
102
-
103
-
104
-
105
-
106
-
107
-
108
-
109
-
110
-
111
-
112
-
113
-
114
-
115
-
116
-
117
-
118
-
119
-
120
-
121
-
122
-
123
-
124
-
125
-
126
-
127
-
128
-
129
-
130
-
131
-
132
-
133
-
134
-
135
-
136
-
137
-
138
-
139
-
140
-
141
-
142
-
143
-
144
-
145
-
146
-
147
-
148
-
149
-
150
-
151
-
152
-
153
-
154
-
155
-
156
-
157
-
158
-
159
-
160
-
161
-
162
-
163
-
164
-
165
-
166
-
167
-
168
-
169
-
170
-
171
-
172
-
173
-
174
-
175
-
176
-
177
-
178
-
179
-
180
-
181
-
182
-
183
-
184
-
185
-
186
-
187
-
188
-
189
-
190
-
191
-
192
-
193
-
194
-
195
-
196
-
197
-
198
-
199
-
200
-
201
-
202
-
203
-
204
-
205
-
206
-
207
-
208
-
209
-
210
-
211
-
212
-
213
-
214
-
215
-
216
-
217
-
218
-
219
-
220
-
221
-
222
-
223
-
224
-
225
-
226
-
227
-
228
-
229
-
230
-
231
-
232
-
233
-
234
-
235
-
236
-
237
-
238
-
239
-
240
-
241
-
242
-
243
-
244
-
245
-
246
-
247
-
248
-
249
-
250
-
251
-
252
-
253
-
254
-
255
-
256
-
257
-
258
-
259
-
260
-
261
-
262
 |
 |
