HTC TyTN II User Manual - Page 83
Protecting Your Device, Protect your USIM/SIM card with a PIN, Protect your device with a password
 |
UPC - 821793001438
View all HTC TyTN II manuals
Add to My Manuals
Save this manual to your list of manuals |
Page 83 highlights
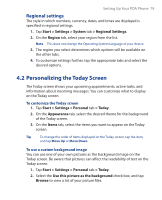
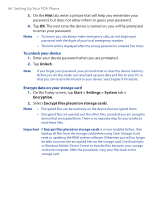
Setting Up Your PDA Phone 83 To set preferred networks 1. Tap Start > Settings > Personal tab > Phone > Network tab. 2. Tap Set Networks and follow the instructions on the screen to arrange the networks according to your preference. 3. After arranging the networks in the preferred order, tap OK to return to the Network tab. 4. In the Network selection list, select Automatic. 5. Tap OK. 4.4 Protecting Your Device Protect your USIM/SIM card with a PIN You can protect your USIM/SIM card from unauthorized use by assigning a PIN (personal identification number). Your first PIN will be given to you by your wireless service provider; you can change the PIN later. 1. On the Phone screen, tap Menu > Options > Phone tab. 2. Select the Require PIN when phone is used check box. 3. To change the PIN at any time, tap Change PIN. Tip Emergency calls can be placed at any time, without requiring a PIN. Protect your device with a password You can help keep your data more secure by requiring a password every time the device is turned on. You create your own password when you begin using your device. To set a device password 1. Tap Start > Settings > Personal tab > Lock. 2. Select the Prompt if device unused for check box, and in the box to the right, select how long your device must be idle before a password is required. In the Password type box, select the type of password you would like to use. Enter and confirm the password. If your device is configured to connect to a network, use an alphanumeric password for increased security for your device.
-
 1
1 -
2
-
3
-
4
-
5
-
6
-
7
-
8
-
9
-
10
-
11
-
12
-
13
-
14
-
15
-
16
-
17
-
18
-
19
-
20
-
21
-
22
-
23
-
24
-
25
-
26
-
27
-
28
-
29
-
30
-
31
-
32
-
33
-
34
-
35
-
36
-
37
-
38
-
39
-
40
-
41
-
42
-
43
-
44
-
45
-
46
-
47
-
48
-
49
-
50
-
51
-
52
-
53
-
54
-
55
-
56
-
57
-
58
-
59
-
60
-
61
-
62
-
63
-
64
-
65
-
66
-
67
-
68
-
69
-
70
-
71
-
72
-
73
-
74
-
75
-
76
-
77
-
 78
78 -
 79
79 -
 80
80 -
 81
81 -
 82
82 -
 83
83 -
 84
84 -
 85
85 -
 86
86 -
 87
87 -
 88
88 -
89
-
90
-
91
-
92
-
93
-
94
-
95
-
96
-
97
-
98
-
99
-
100
-
101
-
102
-
103
-
104
-
105
-
106
-
107
-
108
-
109
-
110
-
111
-
112
-
113
-
114
-
115
-
116
-
117
-
118
-
119
-
120
-
121
-
122
-
123
-
124
-
125
-
126
-
127
-
128
-
129
-
130
-
131
-
132
-
133
-
134
-
135
-
136
-
137
-
138
-
139
-
140
-
141
-
142
-
143
-
144
-
145
-
146
-
147
-
148
-
149
-
150
-
151
-
152
-
153
-
154
-
155
-
156
-
157
-
158
-
159
-
160
-
161
-
162
-
163
-
164
-
165
-
166
-
167
-
168
-
169
-
170
-
171
-
172
-
173
-
174
-
175
-
176
-
177
-
178
-
179
-
180
-
181
-
182
-
183
-
184
-
185
-
186
-
187
-
188
-
189
-
190
-
191
-
192
-
193
-
194
-
195
-
196
-
197
-
198
-
199
-
200
-
201
-
202
-
203
-
204
-
205
-
206
-
207
-
208
-
209
-
210
-
211
-
212
-
213
-
214
-
215
-
216
-
217
-
218
-
219
-
220
-
221
-
222
-
223
-
224
-
225
-
226
-
227
-
228
-
229
-
230
-
231
-
232
-
233
-
234
-
235
-
236
-
237
-
238
-
239
-
240
-
241
-
242
-
243
-
244
-
245
-
246
-
247
-
248
-
249
-
250
-
251
-
252
-
253
-
254
-
255
-
256
-
257
-
258
-
259
-
260
-
261
-
262
 |
 |