HP 1018 HP LaserJet 1018 - User Guide - Page 57
Changing the printer separation pad, At the back of the printer
 |
UPC - 882780435094
View all HP 1018 manuals
Add to My Manuals
Save this manual to your list of manuals |
Page 57 highlights
Changing the printer separation pad NOTE Normal use with good media causes wear. The use of poor media might require more frequent replacement of the separation pad. If the printer regularly pulls multiple sheets of media at a time, you might need to change the separation pad. See Ordering supplies to order a new printer separation pad. Before you change the separation pad, clean the pickup roller. See Cleaning the pickup roller. 1. Turn the printer off, and then unplug the power cord from the printer. Wait for the printer to cool. 2. At the back of the printer, unscrew the two screws holding the separation pad in place. 3. Remove the separation pad. ENWW Changing the printer separation pad 49
-
 1
1 -
2
-
3
-
4
-
5
-
6
-
7
-
8
-
9
-
10
-
11
-
12
-
13
-
14
-
15
-
16
-
17
-
18
-
19
-
20
-
21
-
22
-
23
-
24
-
25
-
26
-
27
-
28
-
29
-
30
-
31
-
32
-
33
-
34
-
35
-
36
-
37
-
38
-
39
-
40
-
41
-
42
-
43
-
44
-
45
-
46
-
47
-
48
-
49
-
50
-
51
-
 52
52 -
 53
53 -
 54
54 -
 55
55 -
 56
56 -
 57
57 -
 58
58 -
 59
59 -
 60
60 -
 61
61 -
 62
62 -
63
-
64
-
65
-
66
-
67
-
68
-
69
-
70
-
71
-
72
-
73
-
74
-
75
-
76
-
77
-
78
-
79
-
80
-
81
-
82
-
83
-
84
-
85
-
86
-
87
-
88
-
89
-
90
-
91
-
92
-
93
-
94
-
95
-
96
-
97
-
98
-
99
-
100
-
101
-
102
-
103
-
104
-
105
-
106
-
107
-
108
-
109
-
110
-
111
-
112
-
113
-
114
-
115
-
116
 |
 |

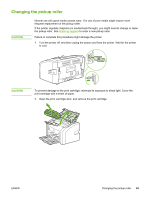
Changing the printer separation pad
Normal use with good media causes wear. The use of poor media might require more
frequent replacement of the separation pad. If the printer regularly pulls multiple sheets of
media at a time, you might need to change the separation pad. See
Ordering
supplies
to
order a new printer separation pad.
NOTE
Before you change the separation pad, clean the pickup roller. See
Cleaning
the
pickup
roller
.
1.
Turn the printer off, and then unplug the power cord from the printer. Wait for the printer
to cool.
2.
At the back of the printer, unscrew the two screws holding the separation pad in place.
3.
Remove the separation pad.
ENWW
Changing the printer separation pad
49