HP 10642 HP 10000 G2 Series Rack Options Installation Guide - Page 14
Installing the sliding shelf
 |
View all HP 10642 manuals
Add to My Manuals
Save this manual to your list of manuals |
Page 14 highlights
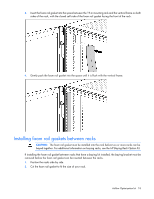
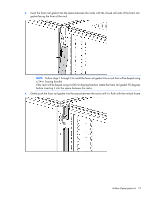
3. Secure the front of the left sliding shelf rail assembly to the front of the rack frame with two M6 x 12 pan HD screws and M6 external washers. 4. Repeat steps 2 and 3 to install the right sliding shelf rail assembly. Installing the sliding shelf 1. Move the sliding shelf into the rack while tilting the front of the shelf up. Align the rear notches on the sliding shelf over the rear tabs on the sliding shelf rail assemblies. 2. Push the sliding shelf down onto the rear tabs to align the front notches on the sliding shelf with the front tabs on the sliding shelf rail assemblies. 3. Lower the front of the sliding shelf over the tabs on the front of the sliding shelf rail assemblies and push down gently to lock the shelf into place. 100 Kilo Sliding Shelf kit 14
-
 1
1 -
2
-
3
-
4
-
5
-
6
-
7
-
8
-
 9
9 -
 10
10 -
 11
11 -
 12
12 -
 13
13 -
 14
14 -
 15
15 -
 16
16 -
 17
17 -
 18
18 -
 19
19 -
20
-
21
-
22
-
23
-
24
-
25
-
26
-
27
-
28
-
29
-
30
-
31
-
32
-
33
-
34
-
35
-
36
-
37
-
38
-
39
-
40
-
41
-
42
-
43
-
44
-
45
-
46
-
47
-
48
-
49
-
50
-
51
-
52
-
53
-
54
-
55
-
56
-
57
-
58
-
59
-
60
-
61
-
62
-
63
-
64
-
65
-
66
-
67
-
68
-
69
-
70
-
71
-
72
-
73
-
74
-
75
-
76
-
77
-
78
-
79
-
80
-
81
-
82
-
83
-
84
-
85
-
86
-
87
-
88
-
89
-
90
-
91
-
92
-
93
-
94
-
95
-
96
-
97
-
98
-
99
-
100
-
101
-
102
-
103
-
104
-
105
-
106
-
107
-
108
-
109
-
110
-
111
-
112
-
113
-
114
-
115
-
116
-
117
-
118
-
119
-
120
-
121
-
122
-
123
-
124
-
125
-
126
-
127
-
128
-
129
 |
 |
