HP 10642 HP 10000 G2 Series Rack Options Installation Guide - Page 27
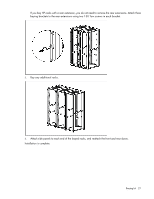
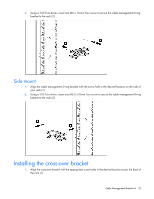
Attach side panels to each end of the bayed racks, and reattach the front and rear doors.
 |
View all HP 10642 manuals
Add to My Manuals
Save this manual to your list of manuals |
Page 27 highlights
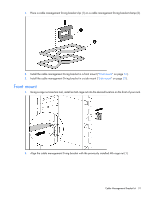
If you bay HP racks with a rear extension, you do not need to remove the rear extensions. Attach three baying brackets to the rear extensions using two T-30 Torx screws in each bracket. 5. Bay any additional racks. 6. Attach side panels to each end of the bayed racks, and reattach the front and rear doors. Installation is complete. Baying kit 27
-
 1
1 -
2
-
3
-
4
-
5
-
6
-
7
-
8
-
9
-
10
-
11
-
12
-
13
-
14
-
15
-
16
-
17
-
18
-
19
-
20
-
21
-
 22
22 -
 23
23 -
 24
24 -
 25
25 -
 26
26 -
 27
27 -
 28
28 -
 29
29 -
 30
30 -
 31
31 -
 32
32 -
33
-
34
-
35
-
36
-
37
-
38
-
39
-
40
-
41
-
42
-
43
-
44
-
45
-
46
-
47
-
48
-
49
-
50
-
51
-
52
-
53
-
54
-
55
-
56
-
57
-
58
-
59
-
60
-
61
-
62
-
63
-
64
-
65
-
66
-
67
-
68
-
69
-
70
-
71
-
72
-
73
-
74
-
75
-
76
-
77
-
78
-
79
-
80
-
81
-
82
-
83
-
84
-
85
-
86
-
87
-
88
-
89
-
90
-
91
-
92
-
93
-
94
-
95
-
96
-
97
-
98
-
99
-
100
-
101
-
102
-
103
-
104
-
105
-
106
-
107
-
108
-
109
-
110
-
111
-
112
-
113
-
114
-
115
-
116
-
117
-
118
-
119
-
120
-
121
-
122
-
123
-
124
-
125
-
126
-
127
-
128
-
129
 |
 |

Baying kit 27
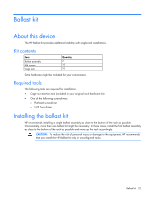
If you bay HP racks with a rear extension, you do not need to remove the rear extensions. Attach three
baying brackets to the rear extensions using two T-30 Torx screws in each bracket.
5.
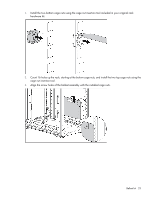
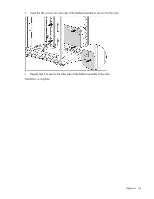
Bay any additional racks.
6.
Attach side panels to each end of the bayed racks, and reattach the front and rear doors.
Installation is complete.