HP 7150 HP Photosmart 7150 printer - (English) Basic Guide - Page 42
Windows PC, Print, Properties, Macintosh, Setup, Quality, Paper Type, use reserve, print mode, - windows 10
 |
UPC - 808736231657
View all HP 7150 manuals
Add to My Manuals
Save this manual to your list of manuals |
Page 42 highlights
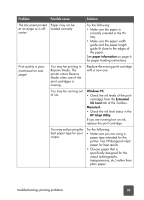
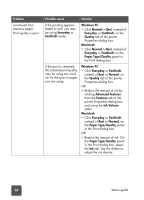
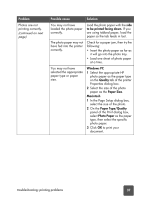
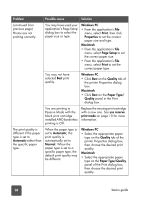
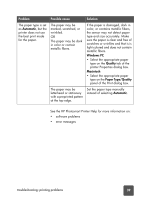
Problem Possible cause Solution (continued from previous page) Photos are not printing correctly. You may have used your application's Page Setup dialog box to select the paper size or type. Windows PC • From the application's File menu, select Print, then click Properties to set the correct paper size and type. Macintosh • From the application's File menu, select Page Setup to set the correct paper size. • From the application's File menu, select Print to set the correct paper type. You may not have selected Best print quality. Windows PC • Click Best on the Quality tab of the printer Properties dialog box. Macintosh • Click Best on the Paper Type/ Quality panel in the Print dialog box. You are printing in Reserve Mode with the black print cartridge installed AND borderless printing is Off. Replace the missing print cartridge with a new one. See use reserve print mode on page 10 for more information. The print quality is different if the paper type is set to Automatic rather than the specific paper type. When the paper type is set to Automatic, the print quality is automatically set to Normal. When the paper type is set to a specific paper type, the default print quality may be different. Windows PC • Select the appropriate paper type on the Quality tab of the printer Properties dialog box, then choose the desired print quality. Macintosh • Select the appropriate paper type on the Paper Type/Quality panel of the Print dialog box, then choose the desired print quality. 38 basics guide
-
 1
1 -
2
-
3
-
4
-
5
-
6
-
7
-
8
-
9
-
10
-
11
-
12
-
13
-
14
-
15
-
16
-
17
-
18
-
19
-
20
-
21
-
22
-
23
-
24
-
25
-
26
-
27
-
28
-
29
-
30
-
31
-
32
-
33
-
34
-
35
-
36
-
 37
37 -
 38
38 -
 39
39 -
 40
40 -
 41
41 -
 42
42 -
 43
43 -
 44
44 -
 45
45 -
 46
46 -
 47
47 -
48
 |
 |
