HP Brio 83xx HP BRIO PC - Online Reference Guide, Not Orderable - Page 59
Installing a Floppy Disk Drive, CD ROM Drive, Zip Drive, or Tape Drive
 |
View all HP Brio 83xx manuals
Add to My Manuals
Save this manual to your list of manuals |
Page 59 highlights
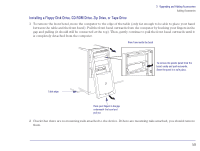
3 Upgrading and Adding Accessories Adding Accessories Installing a Floppy Disk Drive, CD-ROM Drive, Zip Drive, or Tape Drive 1 To remove the front bezel, move the computer to the edge of the table (only far enough to be able to place your hand between the table and the front bezel). Pull the front bezel outwards from the computer by hooking your fingers in the gap and pulling (it should still be connected at the top). Then, gently continue to pull the front bezel outwards until it is completely detached from the computer. View from inside the bezel To remove the plastic panel from the bezel, unclip and push outwards. Store the panel in a safe place. Table edge Hook your fingers in the gap underneath the bezel and pull out 2 Check that there are no mounting rails attached to the device. If there are mounting rails attached, you should remove them. 59
-
 1
1 -
2
-
3
-
4
-
5
-
6
-
7
-
8
-
9
-
10
-
11
-
12
-
13
-
14
-
15
-
16
-
17
-
18
-
19
-
20
-
21
-
22
-
23
-
24
-
25
-
26
-
27
-
28
-
29
-
30
-
31
-
32
-
33
-
34
-
35
-
36
-
37
-
38
-
39
-
40
-
41
-
42
-
43
-
44
-
45
-
46
-
47
-
48
-
49
-
50
-
51
-
52
-
53
-
 54
54 -
 55
55 -
 56
56 -
 57
57 -
 58
58 -
 59
59 -
 60
60 -
 61
61 -
 62
62 -
 63
63 -
 64
64 -
65
-
66
-
67
-
68
-
69
-
70
-
71
-
72
-
73
-
74
-
75
-
76
-
77
-
78
-
79
-
80
-
81
-
82
 |
 |
