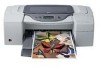
HP Cp1700 Service Manual - Page 272
troubleshooting problems with parts, Check if Carriage Latch faulty.
 |
View all HP Cp1700 manuals
Add to My Manuals
Save this manual to your list of manuals |
Page 272 highlights
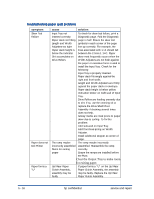
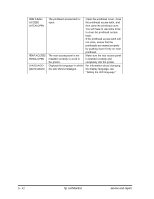
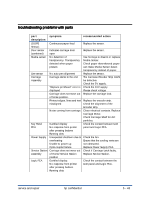
troubleshooting problems with parts part symptom description recommended action (OOPS Sensor) Door sensor (combined) Media sensor Line sensor Carriage Assembly Key Panel PCA Power Supply Service Station Assembly Logic PCA Continuous paper feed Indicates carriage door open No detection of transparency. Transparency detected when paper present. No auto pen alignment Carriage slams to the end "Replace printhead" error is displayed Carriage does not move out of home position. Printout edges, lines and text misaligned Noise coming from carriage. Garbled display No response from printer after pressing buttons Running dots Unexpected shutdown due to overheating Unable to power up Opto-coupler failure Carriage does not move out of Home/Service Station position Garbled display. No response from printer after pressing buttons. Running dots. Replace the sensor. Replace the sensor. Use hot keys to disarm or replace Media Sensor. Check paper skew-skewed paper can make Media Sensor detect transparency instead of paper. Replace the sensor. The Carriage Encoder Strip might be defective. Check the 5V supply. Check the 16V supply. Please check voltage Replace the carriage lock. Replace the encoder strip. Check the alignment of the Encoder strip. Clean electrical contacts. Replace Carriage Motor. Check Carriage Shaft for dirt particles. Check the contact between LCD panel and Logic PCA. Check the fan. Ensure that the cooling vents are not obstructed. Replace Power Supply PCA. Check if Carriage Latch faulty. Replace Service Station. Check the contact between the LCD panel and Logic PCA. service and repair hp confidential 5 - 43
-
 1
1 -
2
-
3
-
4
-
5
-
6
-
7
-
8
-
9
-
10
-
11
-
12
-
13
-
14
-
15
-
16
-
17
-
18
-
19
-
20
-
21
-
22
-
23
-
24
-
25
-
26
-
27
-
28
-
29
-
30
-
31
-
32
-
33
-
34
-
35
-
36
-
37
-
38
-
39
-
40
-
41
-
42
-
43
-
44
-
45
-
46
-
47
-
48
-
49
-
50
-
51
-
52
-
53
-
54
-
55
-
56
-
57
-
58
-
59
-
60
-
61
-
62
-
63
-
64
-
65
-
66
-
67
-
68
-
69
-
70
-
71
-
72
-
73
-
74
-
75
-
76
-
77
-
78
-
79
-
80
-
81
-
82
-
83
-
84
-
85
-
86
-
87
-
88
-
89
-
90
-
91
-
92
-
93
-
94
-
95
-
96
-
97
-
98
-
99
-
100
-
101
-
102
-
103
-
104
-
105
-
106
-
107
-
108
-
109
-
110
-
111
-
112
-
113
-
114
-
115
-
116
-
117
-
118
-
119
-
120
-
121
-
122
-
123
-
124
-
125
-
126
-
127
-
128
-
129
-
130
-
131
-
132
-
133
-
134
-
135
-
136
-
137
-
138
-
139
-
140
-
141
-
142
-
143
-
144
-
145
-
146
-
147
-
148
-
149
-
150
-
151
-
152
-
153
-
154
-
155
-
156
-
157
-
158
-
159
-
160
-
161
-
162
-
163
-
164
-
165
-
166
-
167
-
168
-
169
-
170
-
171
-
172
-
173
-
174
-
175
-
176
-
177
-
178
-
179
-
180
-
181
-
182
-
183
-
184
-
185
-
186
-
187
-
188
-
189
-
190
-
191
-
192
-
193
-
194
-
195
-
196
-
197
-
198
-
199
-
200
-
201
-
202
-
203
-
204
-
205
-
206
-
207
-
208
-
209
-
210
-
211
-
212
-
213
-
214
-
215
-
216
-
217
-
218
-
219
-
220
-
221
-
222
-
223
-
224
-
225
-
226
-
227
-
228
-
229
-
230
-
231
-
232
-
233
-
234
-
235
-
236
-
237
-
238
-
239
-
240
-
241
-
242
-
243
-
244
-
245
-
246
-
247
-
248
-
249
-
250
-
251
-
252
-
253
-
254
-
255
-
256
-
257
-
258
-
259
-
260
-
261
-
262
-
263
-
264
-
265
-
266
-
 267
267 -
 268
268 -
 269
269 -
 270
270 -
 271
271 -
 272
272 -
 273
273 -
 274
274 -
 275
275 -
 276
276 -
 277
277 -
278
-
279
-
280
-
281
-
282
-
283
-
284
-
285
-
286
-
287
-
288
-
289
-
290
 |
 |
