HP DesignJet Z6800 Using Your Printer - Page 174
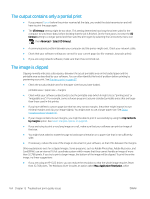
Pen settings seem to have no effect, The image has a wood-grain appearance (aeroworms)
 |
View all HP DesignJet Z6800 manuals
Add to My Manuals
Save this manual to your list of manuals |
Page 174 highlights
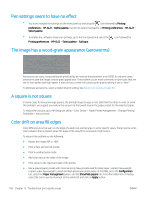
Pen settings seem to have no effect ● You have changed the settings on the front panel by selecting the icon followed by Printing preferences > HP-GL/2 > Define palette, but did not select that palette in Printing preferences > HP-GL/2 > Select palette. ● To enable the software-driven pen settings, go to the front panel and select the Printing preferences > HP-GL/2 > Select palette > Software. icon followed by The image has a wood-grain appearance (aeroworms) Aeroworms are wavy, horizontal bands produced by air-induced dot placement error (DPE). In extreme cases, aeroworms give the image a wood-grain appearance. The problem occurs most commonly on print jobs that are set for low-quality and high-speed. It does not occur when the custom print-quality setting is set to "best." To eliminate aeroworms, select a higher IQ print setting. See Select print quality on page 83. A square is not square In some cases for low grammage papers, the printed image is larger in one side than the other. In order to avoid this problem, we suggest you reduce the vacuum to the lowest level in the paper preset for the selected paper. To reduce the vacuum, go to HP DesignJet Utility > Color Center > Paper Preset Management > Change Printing Properties > Vacuum level. Color drift on area fill edges Color differences can be seen on the edge of a wide non-printed area. In some specific cases, there may be some color variation that is present when the edge of this area fill is composed of light colors. To reduce this problem try the following: ● Rotate the image 90º or 180º. ● Print in fast and normal modes. ● Print in unidirectional mode. ● Add color bars at the sides of the image. ● Print closer to the right hand side of the printer. ● Use a special paper preset with more servicing. New presets exist for plain paper, coated, heavyweight coated, super heavyweight coated and high gloss/satin photo paper. In the EWS, go to the Configuration tab, select the Paper management option, and the Show/hide papers tab. From the hidden list of medias, select the one to use by moving it to the visible list and click on Apply button. 166 Chapter 13 Troubleshoot print-quality issues ENWW
-
 1
1 -
2
-
3
-
4
-
5
-
6
-
7
-
8
-
9
-
10
-
11
-
12
-
13
-
14
-
15
-
16
-
17
-
18
-
19
-
20
-
21
-
22
-
23
-
24
-
25
-
26
-
27
-
28
-
29
-
30
-
31
-
32
-
33
-
34
-
35
-
36
-
37
-
38
-
39
-
40
-
41
-
42
-
43
-
44
-
45
-
46
-
47
-
48
-
49
-
50
-
51
-
52
-
53
-
54
-
55
-
56
-
57
-
58
-
59
-
60
-
61
-
62
-
63
-
64
-
65
-
66
-
67
-
68
-
69
-
70
-
71
-
72
-
73
-
74
-
75
-
76
-
77
-
78
-
79
-
80
-
81
-
82
-
83
-
84
-
85
-
86
-
87
-
88
-
89
-
90
-
91
-
92
-
93
-
94
-
95
-
96
-
97
-
98
-
99
-
100
-
101
-
102
-
103
-
104
-
105
-
106
-
107
-
108
-
109
-
110
-
111
-
112
-
113
-
114
-
115
-
116
-
117
-
118
-
119
-
120
-
121
-
122
-
123
-
124
-
125
-
126
-
127
-
128
-
129
-
130
-
131
-
132
-
133
-
134
-
135
-
136
-
137
-
138
-
139
-
140
-
141
-
142
-
143
-
144
-
145
-
146
-
147
-
148
-
149
-
150
-
151
-
152
-
153
-
154
-
155
-
156
-
157
-
158
-
159
-
160
-
161
-
162
-
163
-
164
-
165
-
166
-
167
-
168
-
 169
169 -
 170
170 -
 171
171 -
 172
172 -
 173
173 -
 174
174 -
 175
175 -
 176
176 -
 177
177 -
 178
178 -
 179
179 -
180
-
181
-
182
-
183
-
184
-
185
-
186
-
187
-
188
-
189
-
190
-
191
-
192
-
193
-
194
-
195
-
196
-
197
-
198
-
199
-
200
-
201
-
202
-
203
-
204
-
205
-
206
-
207
-
208
-
209
-
210
-
211
-
212
-
213
-
214
-
215
-
216
-
217
-
218
-
219
-
220
-
221
-
222
-
223
-
224
-
225
-
226
-
227
-
228
-
229
-
230
-
231
-
232
 |
 |
