HP Digital Sender Flow 8500 User Guide 1 - Page 65
Save to a SharePoint site, Send or save a document using Quick Sets, Scan to a workflow destination
 |
View all HP Digital Sender Flow 8500 manuals
Add to My Manuals
Save this manual to your list of manuals |
Page 65 highlights
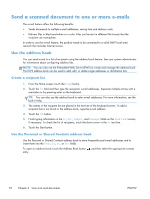
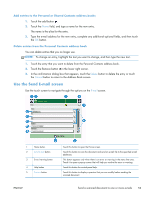
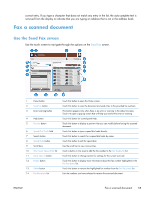
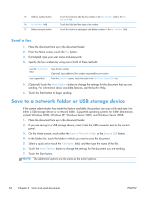
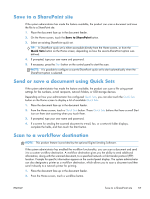
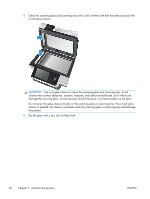
Save to a SharePoint site If the system administrator has made the feature available, the product can scan a document and save the file to a SharePoint site. 1. Place the document face up in the document feeder. 2. On the Home screen, touch the Save to SharePoint button. 3. Select an existing SharePoint quick set. TIP: A SharePoint quick set is either accessible directly from the Home screen, or from the Quick Sets button on the Home screen, depending on how the save-to-SharePoint option was defined. 4. If prompted, type your user name and password. 5. If necessary, press the Start button on the control panel to start the scan. NOTE: It is possible to configure a scan-to-SharePoint quick set to start automatically when the SharePoint option is selected. Send or save a document using Quick Sets If the system administrator has made the feature available, the product can scan a file using preset settings for fax numbers, e-mail recipients, network folders, or USB storage devices. Depending on how your administrator has configured Quick Sets, you can also touch the Quick Sets button on the Home screen to display a list of available Quick Sets. 1. Place the document face up in the document feeder. 2. From the Home screen, touch a Quick Sets button. Those Quick Sets buttons that have a small Start icon on them start scanning when you touch them. 3. If prompted, type your user name and password. 4. If a screen for sending the scanned document to e-mail, fax, or a network folder displays, complete the fields, and then touch the Start button. Scan to a workflow destination NOTE: This product feature is provided by the optional Digital Sending Software. If the system administrator has enabled the workflow functionality, you can scan a document and send it to a custom workflow destination. A workflow destination gives you the ability to send additional information, along with the scanned document, to a specified network or file transfer protocol (FTP) location. Prompts for specific information appear on the control-panel display. The system administrator can also designate a printer as a workflow destination, which allows you to scan a document and then send it directly to a network printer for printing. 1. Place the document face up in the document feeder. 2. From the Home screen, touch a workflow button. ENWW Save to a SharePoint site 57
-
 1
1 -
2
-
3
-
4
-
5
-
6
-
7
-
8
-
9
-
10
-
11
-
12
-
13
-
14
-
15
-
16
-
17
-
18
-
19
-
20
-
21
-
22
-
23
-
24
-
25
-
26
-
27
-
28
-
29
-
30
-
31
-
32
-
33
-
34
-
35
-
36
-
37
-
38
-
39
-
40
-
41
-
42
-
43
-
44
-
45
-
46
-
47
-
48
-
49
-
50
-
51
-
52
-
53
-
54
-
55
-
56
-
57
-
58
-
59
-
 60
60 -
 61
61 -
 62
62 -
 63
63 -
 64
64 -
 65
65 -
 66
66 -
 67
67 -
 68
68 -
 69
69 -
 70
70 -
71
-
72
-
73
-
74
-
75
-
76
-
77
-
78
-
79
-
80
-
81
-
82
-
83
-
84
-
85
-
86
-
87
-
88
-
89
-
90
-
91
-
92
-
93
-
94
-
95
-
96
-
97
-
98
-
99
-
100
-
101
-
102
-
103
-
104
-
105
-
106
-
107
-
108
-
109
-
110
 |
 |