HP Digital Sender Flow 8500 User Guide 1 - Page 85
Lift the hard drive out of the drawer assembly and set the hard drive aside.
 |
View all HP Digital Sender Flow 8500 manuals
Add to My Manuals
Save this manual to your list of manuals |
Page 85 highlights
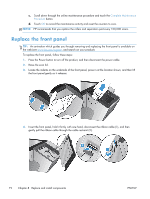
2. Loosen the two thumbscrews which secure the rear panel drawer assembly to the product (1), and then slide the drawer assembly out of its enclosure. You may encounter some resistance as you slide the drawer assembly. 3. Gently lift the drive rail lever on the left leading edge of the hard drive (1), slide the drive forward (2), and then disconnect the cable from the hard drive. 4. Lift the hard drive out of the drawer assembly and set the hard drive aside. ENWW Replace the hard drive 77
-
 1
1 -
2
-
3
-
4
-
5
-
6
-
7
-
8
-
9
-
10
-
11
-
12
-
13
-
14
-
15
-
16
-
17
-
18
-
19
-
20
-
21
-
22
-
23
-
24
-
25
-
26
-
27
-
28
-
29
-
30
-
31
-
32
-
33
-
34
-
35
-
36
-
37
-
38
-
39
-
40
-
41
-
42
-
43
-
44
-
45
-
46
-
47
-
48
-
49
-
50
-
51
-
52
-
53
-
54
-
55
-
56
-
57
-
58
-
59
-
60
-
61
-
62
-
63
-
64
-
65
-
66
-
67
-
68
-
69
-
70
-
71
-
72
-
73
-
74
-
75
-
76
-
77
-
78
-
79
-
 80
80 -
 81
81 -
 82
82 -
 83
83 -
 84
84 -
 85
85 -
 86
86 -
 87
87 -
 88
88 -
 89
89 -
 90
90 -
91
-
92
-
93
-
94
-
95
-
96
-
97
-
98
-
99
-
100
-
101
-
102
-
103
-
104
-
105
-
106
-
107
-
108
-
109
-
110
 |
 |
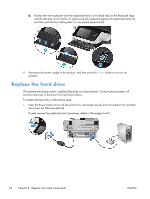
2.
Loosen the two thumbscrews which secure the rear panel drawer assembly to the product (1), and
then slide the drawer assembly out of its enclosure.
You may encounter some resistance as you slide the drawer assembly.
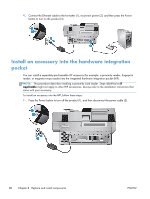
3.
Gently lift the drive rail lever on the left leading edge of the hard drive (1), slide the drive forward
(2), and then disconnect the cable from the hard drive.
4.
Lift the hard drive out of the drawer assembly and set the hard drive aside.
ENWW
Replace the hard drive
77