HP ENVY 17-k300 ENVY 17 Notebook PC ENVY 15 Notebook PC ENVY m7 Notebook PC Ma - Page 51
Remove the optical drive see, Remove the keyboard/top cover from the base enclosure see
 |
View all HP ENVY 17-k300 manuals
Add to My Manuals
Save this manual to your list of manuals |
Page 51 highlights
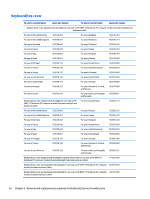
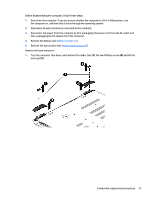
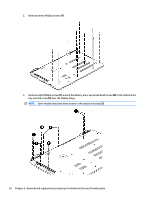
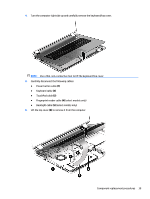
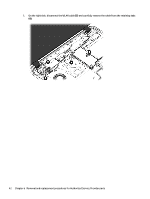
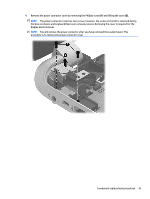
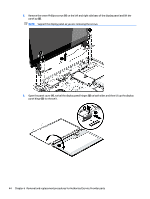
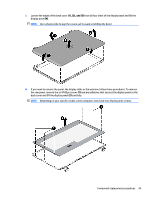
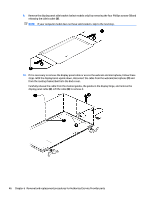
Component For use only on HP ENVY 17 Notebook PC computer models Display panel: 17.3-in, AntiGlare, HD, WLED for TouchScreen computer models 17.3-in, BrightView, HD, LED for non-TouchScreen computer models 17.3-in, AntiGlare, FHD, LED for non-TouchScreen computer models 17.3-in, AntiGlare, FHD, WLED for TouchScreen computer models 15.6-in, AntiGlare, HD, WLED for TouchScreen computer models with bezel 15.6-in, BrightView, HD, LED for non-TouchScreen computer models 15.6-in, AntiGlare, FHD, WLED for TouchScreen computer models with bezel 15.6-in, BV, FHD, LED for non-TouchScreen computer models with bezel Webcam/microphone module: For use only on non-TouchScreen models For use only on TouchScreen models 3D webcam module (select models only) Spare part number 763696-001 763931-001 763932-001 763933-001 763934-001 763575-001 763581-001 763576-001 763582-001 762521-001 762545-001 794990-001 Before removing the display panel, follow these steps: 1. Shut down the computer. If you are unsure whether the computer is off or in Hibernation, turn the computer on, and then shut it down through the operating system. 2. Disconnect all external devices connected to the computer. 3. Disconnect the power from the computer by first unplugging the power cord from the AC outlet and then unplugging the AC adapter from the computer. 4. Remove the battery (see Battery on page 32). 5. Remove the optical drive (see Optical drive on page 33). 6. Remove the keyboard/top cover from the base enclosure (see Keyboard/top cover on page 36). Remove the display panel: 1. Open the computer. 2. Disengage the display cable (1) and disconnect the display connector (2) on the left side base of the display panel. Component replacement procedures 41
-
 1
1 -
2
-
3
-
4
-
5
-
6
-
7
-
8
-
9
-
10
-
11
-
12
-
13
-
14
-
15
-
16
-
17
-
18
-
19
-
20
-
21
-
22
-
23
-
24
-
25
-
26
-
27
-
28
-
29
-
30
-
31
-
32
-
33
-
34
-
35
-
36
-
37
-
38
-
39
-
40
-
41
-
42
-
43
-
44
-
45
-
 46
46 -
 47
47 -
 48
48 -
 49
49 -
 50
50 -
 51
51 -
 52
52 -
 53
53 -
 54
54 -
 55
55 -
 56
56 -
57
-
58
-
59
-
60
-
61
-
62
-
63
-
64
-
65
-
66
-
67
-
68
-
69
-
70
-
71
-
72
-
73
-
74
-
75
-
76
-
77
-
78
-
79
-
80
-
81
-
82
-
83
-
84
-
85
-
86
-
87
-
88
-
89
-
90
-
91
-
92
-
93
-
94
-
95
-
96
-
97
-
98
-
99
-
100
-
101
-
102
-
103
-
104
-
105
-
106
-
107
-
108
-
109
-
110
-
111
-
112
-
113
-
114
-
115
-
116
-
117
-
118
-
119
-
120
-
121
-
122
-
123
-
124
-
125
-
126
-
127
-
128
-
129
-
130
 |
 |