HP ENVY 17-k300 ENVY 17 Notebook PC ENVY 15 Notebook PC ENVY m7 Notebook PC Ma - Page 54
on both sides and then tilt up the display, panel hinge
 |
View all HP ENVY 17-k300 manuals
Add to My Manuals
Save this manual to your list of manuals |
Page 54 highlights
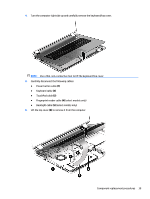
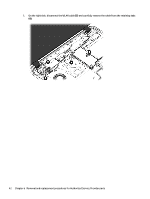
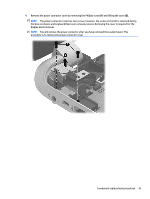
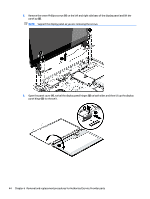
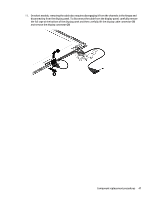
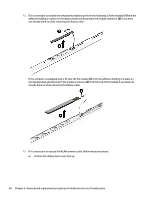
5. Remove the seven Phillips screws (1) on the left and right side base of the display panel and lift the panel up (2). NOTE: Support the display panel as you are removing the screws. 6. Open the panel cover (1), swivel the display panel hinges (2) on both sides and then tilt up the display panel hinge (3) to release it. 44 Chapter 6 Removal and replacement procedures for Authorized Service Provider parts
-
 1
1 -
2
-
3
-
4
-
5
-
6
-
7
-
8
-
9
-
10
-
11
-
12
-
13
-
14
-
15
-
16
-
17
-
18
-
19
-
20
-
21
-
22
-
23
-
24
-
25
-
26
-
27
-
28
-
29
-
30
-
31
-
32
-
33
-
34
-
35
-
36
-
37
-
38
-
39
-
40
-
41
-
42
-
43
-
44
-
45
-
46
-
47
-
48
-
 49
49 -
 50
50 -
 51
51 -
 52
52 -
 53
53 -
 54
54 -
 55
55 -
 56
56 -
 57
57 -
 58
58 -
 59
59 -
60
-
61
-
62
-
63
-
64
-
65
-
66
-
67
-
68
-
69
-
70
-
71
-
72
-
73
-
74
-
75
-
76
-
77
-
78
-
79
-
80
-
81
-
82
-
83
-
84
-
85
-
86
-
87
-
88
-
89
-
90
-
91
-
92
-
93
-
94
-
95
-
96
-
97
-
98
-
99
-
100
-
101
-
102
-
103
-
104
-
105
-
106
-
107
-
108
-
109
-
110
-
111
-
112
-
113
-
114
-
115
-
116
-
117
-
118
-
119
-
120
-
121
-
122
-
123
-
124
-
125
-
126
-
127
-
128
-
129
-
130
 |
 |
5.
Remove the seven Phillips screws
(1)
on the left and right side base of the display panel and lift the
panel up
(2)
.
NOTE:
Support the display panel as you are removing the screws.
6.
Open the panel cover
(1)
, swivel the display panel hinges
(2)
on both sides and then tilt up the display
panel hinge
(3)
to release it.
44
Chapter 6
Removal and replacement procedures for Authorized Service Provider parts