HP EliteBook 630 Maintenance and Service Guide - Page 46
cover from the computer, Before removing the bottom cover, prepare the computer for disassembly see
 |
View all HP EliteBook 630 manuals
Add to My Manuals
Save this manual to your list of manuals |
Page 46 highlights
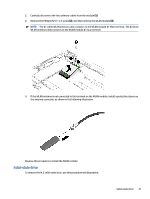
Before removing the bottom cover, prepare the computer for disassembly (see Preparation for disassembly on page 37). Remove the bottom cover: 1. Loosen the five captive Phillips screws that secure the bottom cover to the computer. 2. Starting near the hinges, use a nonmarking, nonconductive tool (1) to release the edges of the bottom cover from the computer (2). 3. Remove the bottom cover from the computer (3). To replace the bottom cover, reverse the removal procedures. 38 Chapter 5 Removal and replacement procedures for Customer Self-Repair parts
-
 1
1 -
2
-
3
-
4
-
5
-
6
-
7
-
8
-
9
-
10
-
11
-
12
-
13
-
14
-
15
-
16
-
17
-
18
-
19
-
20
-
21
-
22
-
23
-
24
-
25
-
26
-
27
-
28
-
29
-
30
-
31
-
32
-
33
-
34
-
35
-
36
-
37
-
38
-
39
-
40
-
 41
41 -
 42
42 -
 43
43 -
 44
44 -
 45
45 -
 46
46 -
 47
47 -
 48
48 -
 49
49 -
 50
50 -
 51
51 -
52
-
53
-
54
-
55
-
56
-
57
-
58
-
59
-
60
-
61
-
62
-
63
-
64
-
65
-
66
-
67
-
68
-
69
-
70
-
71
-
72
-
73
-
74
-
75
-
76
-
77
-
78
-
79
-
80
-
81
-
82
-
83
-
84
-
85
-
86
-
87
-
88
-
89
-
90
-
91
-
92
-
93
-
94
-
95
-
96
-
97
-
98
-
99
-
100
-
101
-
102
-
103
 |
 |

Before removing the bottom cover, prepare the computer for disassembly (see
Preparation for disassembly
on
page
37
).
Remove the bottom cover:
1.
Loosen the five captive Phillips screws that secure the bottom cover to the computer.
2.
Starting near the hinges, use a nonmarking, nonconductive tool
(1)
to release the edges of the bottom
cover from the computer
(2)
.
3.
Remove the bottom cover from the computer
(3)
.
To replace the bottom cover, reverse the removal procedures.
38
Chapter 5
Removal and replacement procedures for Customer Self-Repair parts