HP EliteBook 745 Maintenance and Service Guide - Page 47
Memory modules
 |
View all HP EliteBook 745 manuals
Add to My Manuals
Save this manual to your list of manuals |
Page 47 highlights
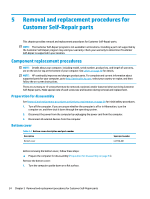
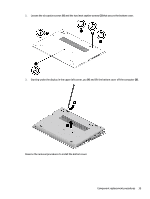
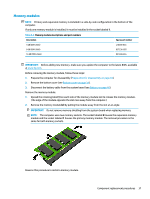
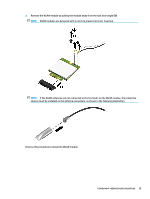
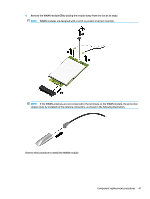
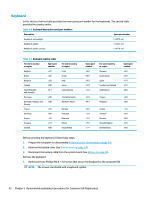
Memory modules NOTE: Primary and expansion memory is installed in a side-by-side configuration in the bottom of the computer. If only one memory module is installed, it must be installed in the socket labeled 1. Table 5-3 Memory module descriptions and part numbers Description Spare part number 4 GB (DDR-2666) 8 GB (DDR-2666) 16 GB (DDR-2666) L10598-855 937236-855 937438-855 IMPORTANT: Before adding new memory, make sure you update the computer to the latest BIOS, available at www.hp.com. Before removing the memory module, follow these steps: 1. Prepare the computer for disassembly (Preparation for disassembly on page 34). 2. Remove the bottom cover (see Bottom cover on page 34). 3. Disconnect the battery cable from the system board (see Battery on page 46). Remove the memory module: 1. Spread the retaining tabs (1) on each side of the memory module slot to release the memory module. (The edge of the module opposite the slot rises away from the computer.) 2. Remove the memory module (2) by pulling the module away from the slot at an angle. IMPORTANT: Do not remove memory shielding from the system board when replacing memory. NOTE: The computer uses two memory sockets. The socket labeled 2 houses the expansion memory module and the socket labeled 1 houses the primary memory module. The removal procedure is the same for both memory sockets. Reverse this procedure to install a memory module. Component replacement procedures 37
-
 1
1 -
2
-
3
-
4
-
5
-
6
-
7
-
8
-
9
-
10
-
11
-
12
-
13
-
14
-
15
-
16
-
17
-
18
-
19
-
20
-
21
-
22
-
23
-
24
-
25
-
26
-
27
-
28
-
29
-
30
-
31
-
32
-
33
-
34
-
35
-
36
-
37
-
38
-
39
-
40
-
41
-
 42
42 -
 43
43 -
 44
44 -
 45
45 -
 46
46 -
 47
47 -
 48
48 -
 49
49 -
 50
50 -
 51
51 -
 52
52 -
53
-
54
-
55
-
56
-
57
-
58
-
59
-
60
-
61
-
62
-
63
-
64
-
65
-
66
-
67
-
68
-
69
-
70
-
71
-
72
-
73
-
74
-
75
-
76
-
77
-
78
-
79
-
80
-
81
-
82
-
83
-
84
-
85
-
86
-
87
-
88
-
89
-
90
-
91
-
92
-
93
-
94
-
95
-
96
-
97
-
98
-
99
-
100
-
101
-
102
-
103
-
104
-
105
-
106
-
107
-
108
-
109
-
110
-
111
-
112
-
113
-
114
-
115
-
116
-
117
-
118
-
119
 |
 |