HP EliteBook 745 Maintenance and Service Guide - Page 73
System board, Memory modules see
 |
View all HP EliteBook 745 manuals
Add to My Manuals
Save this manual to your list of manuals |
Page 73 highlights
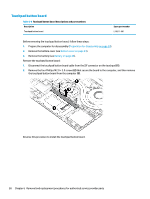
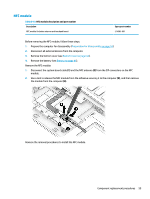
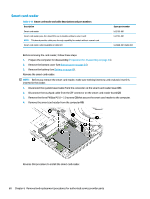
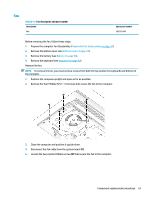
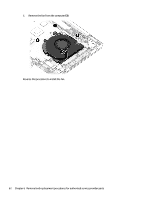
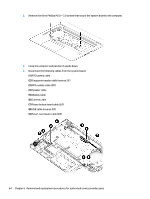
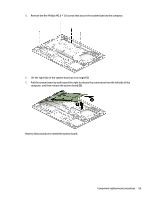
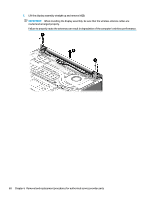
System board NOTE: All system board spare part kits include replacement thermal material. All system boards use the following part numbers: xxxxxx-001: Non-Windows operating systems xxxxxx-601: Windows operating system Table 6-13 System board descriptions and part numbers Description System board with integrated AMD Ryzen 7 PRO 3700U processor System board with integrated AMD Ryzen 5 PRO 3500U processor System board with integrated AMD Ryzen 3 PRO 3300U processor Spare part number L62296-xx1 L62295-xx1 L62294-xx1 Before removing the system board, follow these steps: 1. Prepare the computer for disassembly (Preparation for disassembly on page 34). 2. Remove the bottom cover (see Bottom cover on page 34). 3. Remove the battery (see Battery on page 46). 4. Remove the keyboard (see Keyboard on page 42). 5. Remove the RJ-45 board and bracket (see RJ-45 board with bracket on page 53). 6. Remove the fan (see Fan on page 61). When replacing the system board, be sure to remove the following components (as applicable) from the defective system board and install on the replacement system board: ● Solid-state drive (see Solid-state drive (SSD) on page 36) ● Memory modules (see Memory modules on page 37) ● WLAN/Bluetooth module (see WLAN/Bluetooth combo card on page 38) ● WWAN module (see WWAN module on page 40) ● Heat sink (see Heat sink assembly on page 48) Remove the system board: 1. Position the computer upright and open as far as possible. Component replacement procedures 63
-
 1
1 -
2
-
3
-
4
-
5
-
6
-
7
-
8
-
9
-
10
-
11
-
12
-
13
-
14
-
15
-
16
-
17
-
18
-
19
-
20
-
21
-
22
-
23
-
24
-
25
-
26
-
27
-
28
-
29
-
30
-
31
-
32
-
33
-
34
-
35
-
36
-
37
-
38
-
39
-
40
-
41
-
42
-
43
-
44
-
45
-
46
-
47
-
48
-
49
-
50
-
51
-
52
-
53
-
54
-
55
-
56
-
57
-
58
-
59
-
60
-
61
-
62
-
63
-
64
-
65
-
66
-
67
-
 68
68 -
 69
69 -
 70
70 -
 71
71 -
 72
72 -
 73
73 -
 74
74 -
 75
75 -
 76
76 -
 77
77 -
 78
78 -
79
-
80
-
81
-
82
-
83
-
84
-
85
-
86
-
87
-
88
-
89
-
90
-
91
-
92
-
93
-
94
-
95
-
96
-
97
-
98
-
99
-
100
-
101
-
102
-
103
-
104
-
105
-
106
-
107
-
108
-
109
-
110
-
111
-
112
-
113
-
114
-
115
-
116
-
117
-
118
-
119
 |
 |