HP Jetdirect ew2500 HP Jetdirect ew2500 802.11g Wireless Print Server Setup Gu - Page 11
Test button functions - print server
 |
View all HP Jetdirect ew2500 manuals
Add to My Manuals
Save this manual to your list of manuals |
Page 11 highlights
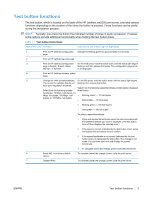
Test button functions The test button, which is located on the back of the HP Jetdirect ew2500 print server, provides various functions depending on the number of the times the button is pressed. These functions can be useful during the installation process. NOTE: Typically, you press the button the indicated number of times in quick succession. However, some options provide additional functionality when holding the last button press. Table 1-1 Test button instructions Button Presses Function Instructions and Status Light (if applicable) 1 Print an HP Jetdirect configuration Changes to blinking green for approximately five seconds. page. 2 Print an HP Jetdirect security page. 3 Print an HP Jetdirect configuration On the third press, hold the button down until the status light begins page in English, French, Italian, blinking, and then release the button. The configuration page prints German, or Spanish. in all languages. 4 Print an HP Jetdirect wireless status page. 5 Change the LAN speed/handshake. On the fifth press, hold the button down until the status light begins This is only for switches that do not blinking, then release the button. have auto negotiation mode set, Select from the following speed/handshake combinations (displayed Select from the following speeds/ three times): handshake: 10 Mbps. half-duplex, 10 Mbps. full-duplex, 100 Mbps. half- ● Blinking amber - 10 half-duplex duplex, or 100 Mbps. full-duplex. ● Solid amber - 10 full-duplex ● Blinking green - 100 half-duplex ● Solid green - 100 full-duplex To select a speed/handshake: 1. Press and release the test button when the color associated with the speed/handshake you want is displayed. (The test button turns off then displays the selected color.) 2. If the speed is correct (indicated by the test button color), press and release the test button once to confirm. 3. If the speed/handshake is not correct (indicated by the test button color), do not press the test button. The change is not made. You can then start over and change the speed/ handshake. 4. To complete (save) the change, power cycle the print server. 6 Reset 802.1x to factory default To complete (save) the change, power cycle the print server. values. 7 Disable IPsec. To complete (save) the change, power cycle the print server. ENWW Test button functions 3
-
 1
1 -
2
-
3
-
4
-
5
-
 6
6 -
 7
7 -
 8
8 -
 9
9 -
 10
10 -
 11
11 -
 12
12 -
 13
13 -
 14
14 -
 15
15 -
 16
16 -
17
-
18
-
19
-
20
-
21
-
22
-
23
-
24
-
25
-
26
-
27
-
28
-
29
-
30
-
31
-
32
-
33
-
34
-
35
-
36
-
37
-
38
-
39
-
40
-
41
-
42
-
43
-
44
-
45
-
46
-
47
-
48
-
49
-
50
-
51
-
52
-
53
-
54
-
55
-
56
-
57
-
58
 |
 |