HP LaserJet 6L HP LaserJet 6L Printer - User Manual - Page 12
Loading Paper into the Printer - multiple pages
 |
View all HP LaserJet 6L manuals
Add to My Manuals
Save this manual to your list of manuals |
Page 12 highlights
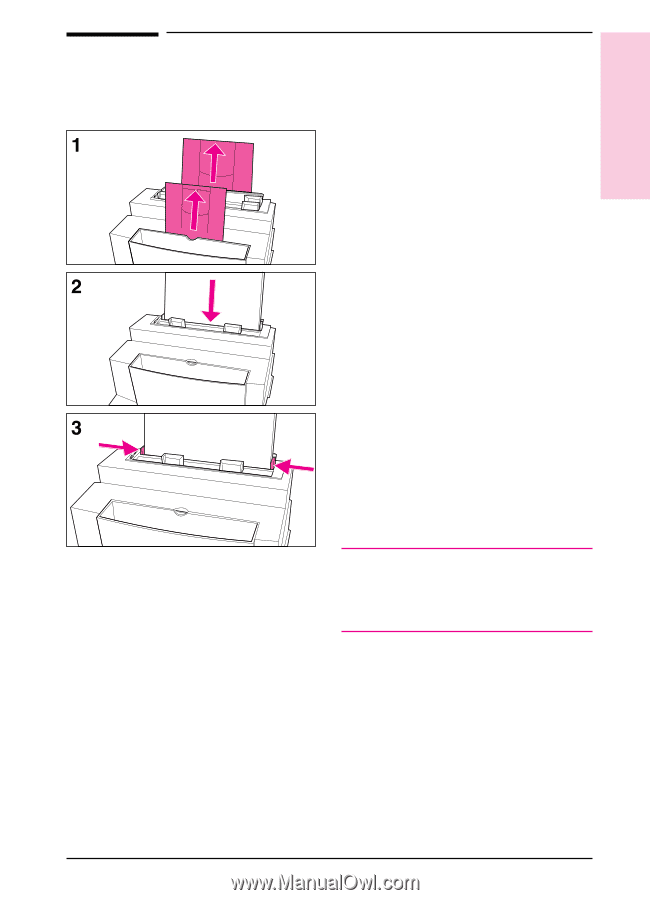
1 Set Up Loading Paper into the Printer Before loading paper into the printer, you will want to raise the paper supports located behind the Paper Input Bin and the Paper Output Bin. Using paper supports can help prevent unwanted paper curl and paper jams. These supports can be extended for different lengths of paper. 1 Raise the supports on the Paper Input Bin and on the Paper Output Bin until they snap into place. 2 Insert up to 100 sheets of paper into the Paper Input Bin. Be careful not to overfill the bin. The Ready (bottom) light will come on. 3 Center the paper using the paper guides on the Paper Input Bin. If you want to test your printer, you can print the self-test page. To do so, make sure the Ready (bottom) light is on and all other indicator lights are off. Press and release the Front Panel button. (If the printer is in SleepMode [all lights are off], you will need to press the Front Panel button twice.) The Data (middle) light will come on and the Ready (bottom) light will blink. The self-test page prints. Note When adding paper to an existing stack in the Paper Input Bin, always remove and realign all paper to avoid multiple paper feeds or paper jams or both. EN Set Up 1-5
-
 1
1 -
2
-
3
-
4
-
5
-
6
-
 7
7 -
 8
8 -
 9
9 -
 10
10 -
 11
11 -
 12
12 -
 13
13 -
 14
14 -
 15
15 -
 16
16 -
 17
17 -
18
-
19
-
20
-
21
-
22
-
23
-
24
-
25
-
26
-
27
-
28
-
29
-
30
-
31
-
32
-
33
-
34
-
35
-
36
-
37
-
38
-
39
-
40
-
41
-
42
-
43
-
44
-
45
-
46
-
47
-
48
-
49
-
50
-
51
-
52
-
53
-
54
-
55
-
56
-
57
-
58
-
59
-
60
-
61
-
62
-
63
-
64
 |
 |