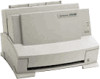
HP LaserJet 6L HP LaserJet 6L Printer - User Manual - Page 17
Installing Memory Cards DRAM
 |
View all HP LaserJet 6L manuals
Add to My Manuals
Save this manual to your list of manuals |
Page 17 highlights
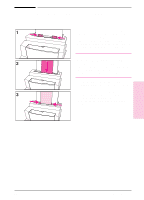
Installing Memory Cards (DRAM) Your HP LaserJet 6L printer is capable of accepting any 70ns or faster (such as a 50ns), 5V, DRAM memory card meeting JEIDA specifications. Hewlett-Packard offers 1-, 2-, and 4-MB DRAM memory cards. Note Some printer drivers have an adjustable memory setting. After installing or removing a memory card, this setting may require an adjustment to reflect the new memory total. 1 Unplug the power cord from the printer. 2 Open the Printer Door, remove the toner cartridge, and close the Printer Door. Protect the toner cartridge from light while working on the printer. 3 Gently tip the printer onto its side so that the memory cover is on top. 4 Remove the Memory Expansion Cover by placing a finger through the hole and pulling away from the printer. 5 Align the memory card with the corner notch so it is positioned as shown. Push it firmly into the printer. Replace the Memory Expansion Cover, set the printer upright, reinstall the toner cartridge, load the paper, and plug the power cord back into the printer. Print a self-test page to ensure that the printer recognizes the additional memory you have added. Your Total Memory in the "Printer Configuration" section will show the new memory total. 1-10 Set Up EN
-
 1
1 -
2
-
3
-
4
-
5
-
6
-
7
-
8
-
9
-
10
-
11
-
 12
12 -
 13
13 -
 14
14 -
 15
15 -
 16
16 -
 17
17 -
 18
18 -
 19
19 -
 20
20 -
 21
21 -
 22
22 -
23
-
24
-
25
-
26
-
27
-
28
-
29
-
30
-
31
-
32
-
33
-
34
-
35
-
36
-
37
-
38
-
39
-
40
-
41
-
42
-
43
-
44
-
45
-
46
-
47
-
48
-
49
-
50
-
51
-
52
-
53
-
54
-
55
-
56
-
57
-
58
-
59
-
60
-
61
-
62
-
63
-
64
 |
 |
