HP LaserJet 6L HP LaserJet 6L Printer - User Manual - Page 32
Solving Printer Problems - printer driver windows 7
 |
View all HP LaserJet 6L manuals
Add to My Manuals
Save this manual to your list of manuals |
Page 32 highlights
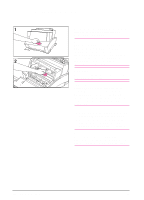
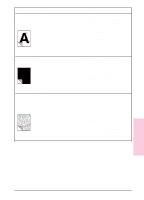
Solving Printer Problems Use the following table to help pinpoint and solve printer problems. Symptom Possible Cause Solution(s) The printer isn't responding after "print" is selected in the software. The printer may be paused. Resume printing from the status window or Print Manager. The printer may be in Manual Press and release the Front Panel button. Feed mode (Data light blinking). The parallel cable between the printer and the computer is not connected properly. Disconnect and reconnect the parallel cable between the printer and the computer. The parallel cable is defective. If possible, attach your cable to another system and print a job that you know works. You may also try using a different parallel cable (IEEE-1284). The wrong printer was selected in your software. Check your software's printer selection menu to see if you selected the HP LaserJet 6L printer. The software for your printer is not configured for the correct printer port. Check your software's printer selection menu to make sure it is accessing the correct printer port. If your computer has more than one parallel port, make sure the parallel cable is connected to the correct one. The power cord is not Check the power cord connection and the power source. connected to the printer or Try a different outlet. the power source is not active. The printer is connected to a Check the switchbox setting. switchbox that is not set up Try connecting the printer directly to the computer. The correctly. switchbox may be defective. The printer is malfunctioning. If all the lights are on, the printer may be signaling a hardware error. See "All the printer's lights are on" on the following page. The Error (top) light stays on. The printer is out of print media. Add paper or other print media. The printer door is open. Close the door securely. The toner cartridge is not installed completely. Open the door, reinstall the toner cartridge, then close the door securely. Paper is jammed in the printer. See "Clearing Paper Jams" earlier in this chapter. The Error (top) light is blinking. The page is too complex for the printer's memory capacity, or the printer may not be able to create the image fast enough to keep pace with the printing process. Briefly press and release the Front Panel button to resume printing. Some data loss may occur. See your printer driver Help for suggestions regarding printer memory usage. Change your page to make it less complex by reducing resolution to 300 dpi, or add optional printer memory (see chapter 1). Both the Data (middle) light and the Ready (bottom) light are on steadily (not blinking). Unprinted data is in the printer. (Your software did not send an "end of job" or "form feed" command.) Briefly press and release the Front Panel button to print the rest of the data. 4 Troubleshooting EN Troubleshooting 4-5
-
 1
1 -
2
-
3
-
4
-
5
-
6
-
7
-
8
-
9
-
10
-
11
-
12
-
13
-
14
-
15
-
16
-
17
-
18
-
19
-
20
-
21
-
22
-
23
-
24
-
25
-
26
-
 27
27 -
 28
28 -
 29
29 -
 30
30 -
 31
31 -
 32
32 -
 33
33 -
 34
34 -
 35
35 -
 36
36 -
 37
37 -
38
-
39
-
40
-
41
-
42
-
43
-
44
-
45
-
46
-
47
-
48
-
49
-
50
-
51
-
52
-
53
-
54
-
55
-
56
-
57
-
58
-
59
-
60
-
61
-
62
-
63
-
64
 |
 |
