HP LaserJet Enterprise MFP M633 User Guide - Page 107
Step five: Set up Send to Email to use Office 365 Outlook (optional), Introduction
 |
View all HP LaserJet Enterprise MFP M633 manuals
Add to My Manuals
Save this manual to your list of manuals |
Page 107 highlights
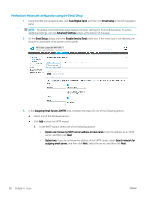
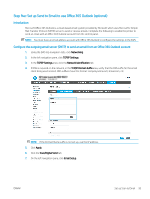
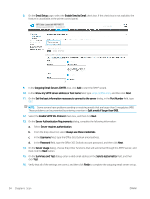
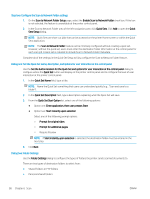
Step five: Set up Send to Email to use Office 365 Outlook (optional) Introduction Microsoft Office 365 Outlook is a cloud-based email system provided by Microsoft which uses Microsoft's Simple Mail Transfer Protocol (SMTP) server to send or receive emails. Complete the following to enable the printer to send an email with an Office 365 Outlook account from the control panel. NOTE: You must have an email address account with Office 365 Outlook to configure the settings in the EWS. Configure the outgoing email server (SMTP) to send an email from an Office 365 Outlook account 1. Using the EWS top navigation tabs, click Networking. 2. In the left navigation pane, click TCP/IP Settings. 3. In the TCP/IP Settings area, click the Network Identification tab. 4. If DNS is required on the network, in the TCP/IP Domain Suffix area, verify that the DNS suffix for the email client being used is listed. DNS suffixes have this format: companyname.com, Gmail.com, etc. NOTE: If the Domain Name suffix is not set up, use the IP address. 5. Click Apply. 6. Click the Scan/Digital Send tab. 7. On the left navigation pane, click Email Setup. ENWW Set up Scan to Email 93
-
 1
1 -
2
-
3
-
4
-
5
-
6
-
7
-
8
-
9
-
10
-
11
-
12
-
13
-
14
-
15
-
16
-
17
-
18
-
19
-
20
-
21
-
22
-
23
-
24
-
25
-
26
-
27
-
28
-
29
-
30
-
31
-
32
-
33
-
34
-
35
-
36
-
37
-
38
-
39
-
40
-
41
-
42
-
43
-
44
-
45
-
46
-
47
-
48
-
49
-
50
-
51
-
52
-
53
-
54
-
55
-
56
-
57
-
58
-
59
-
60
-
61
-
62
-
63
-
64
-
65
-
66
-
67
-
68
-
69
-
70
-
71
-
72
-
73
-
74
-
75
-
76
-
77
-
78
-
79
-
80
-
81
-
82
-
83
-
84
-
85
-
86
-
87
-
88
-
89
-
90
-
91
-
92
-
93
-
94
-
95
-
96
-
97
-
98
-
99
-
100
-
101
-
 102
102 -
 103
103 -
 104
104 -
 105
105 -
 106
106 -
 107
107 -
 108
108 -
 109
109 -
 110
110 -
 111
111 -
 112
112 -
113
-
114
-
115
-
116
-
117
-
118
-
119
-
120
-
121
-
122
-
123
-
124
-
125
-
126
-
127
-
128
-
129
-
130
-
131
-
132
-
133
-
134
-
135
-
136
-
137
-
138
-
139
-
140
-
141
-
142
-
143
-
144
-
145
-
146
-
147
-
148
-
149
-
150
-
151
-
152
-
153
-
154
-
155
-
156
-
157
-
158
-
159
-
160
-
161
-
162
-
163
-
164
-
165
-
166
-
167
-
168
-
169
-
170
-
171
-
172
-
173
-
174
-
175
-
176
-
177
-
178
-
179
-
180
-
181
-
182
-
183
-
184
-
185
-
186
-
187
-
188
-
189
-
190
-
191
-
192
-
193
-
194
-
195
-
196
-
197
-
198
-
199
-
200
-
201
-
202
-
203
-
204
-
205
-
206
-
207
-
208
-
209
-
210
-
211
-
212
-
213
-
214
-
215
-
216
-
217
-
218
-
219
-
220
-
221
-
222
-
223
-
224
-
225
-
226
-
227
-
228
-
229
-
230
-
231
-
232
-
233
-
234
-
235
-
236
-
237
-
238
-
239
-
240
-
241
-
242
-
243
-
244
-
245
-
246
-
247
-
248
-
249
-
250
-
251
-
252
-
253
-
254
 |
 |