HP LaserJet Pro MFP 4101-4104dw User Guide 1 - Page 153
Check the image adjustment settings, Optimize for text or pictures
 |
View all HP LaserJet Pro MFP 4101-4104dw manuals
Add to My Manuals
Save this manual to your list of manuals |
Page 153 highlights
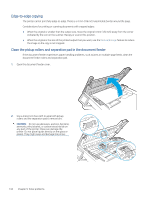
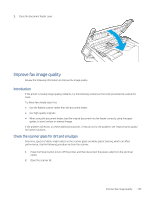
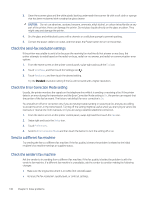
Check the image adjustment settings To improve copy quality, adjust the image settings using the printer control panel. 1. From the Home screen on the printer control panel, touch the Copy icon. 2. Touch the Document or ID Card icon. 3. Touch the Settings icon , and then scroll to and touch the following menu items to adjust the settings: ● Quality: Choose the output quality for the image. ● Lighter/Darker: Adjust the lightness/darkness setting. ● Enhancements: Choose an image enhancement option. ● Binding Margin: Turn the binding margin setting on or off. 4. Touch the Back button to return to the main copy menu, and then touch Copy to begin copying. Optimize for text or pictures Follow these steps to optimize the scan or copy for text or pictures. 1. From the Home screen on the printer control panel, touch the Copy icon. 2. Touch the Document or ID Card icon. 3. Touch the Settings icon , and then scroll to and touch Enhancements. 4. Touch one of the following options depending on the type of document you are copying: ● None: Use this setting when you are not concerned about the quality of the copy. This is the default setting. ● Text: Use this setting for documents that contain mostly text. ● Photo: Use this setting for photos or documents that contain mostly graphics. ● Mixed: Use this setting for documents that contain a mixture of text and graphics. Check the scanner resolution and color settings on the computer If you are printing a scanned image, and the quality is not what you expected, you might have selected a resolution or color setting in the scanner software that does not match your needs. Resolution and color affect the following features of scanned images: ● Image clarity ● Texture of gradations (smooth or rough) ● Scan time ● File size Scanning resolution is measured in pixels per inch (ppi). NOTE: Scanning ppi levels are not interchangeable with printing dpi (dots per inch) levels. 142 Chapter 9 Solve problems
-
 1
1 -
2
-
3
-
4
-
5
-
6
-
7
-
8
-
9
-
10
-
11
-
12
-
13
-
14
-
15
-
16
-
17
-
18
-
19
-
20
-
21
-
22
-
23
-
24
-
25
-
26
-
27
-
28
-
29
-
30
-
31
-
32
-
33
-
34
-
35
-
36
-
37
-
38
-
39
-
40
-
41
-
42
-
43
-
44
-
45
-
46
-
47
-
48
-
49
-
50
-
51
-
52
-
53
-
54
-
55
-
56
-
57
-
58
-
59
-
60
-
61
-
62
-
63
-
64
-
65
-
66
-
67
-
68
-
69
-
70
-
71
-
72
-
73
-
74
-
75
-
76
-
77
-
78
-
79
-
80
-
81
-
82
-
83
-
84
-
85
-
86
-
87
-
88
-
89
-
90
-
91
-
92
-
93
-
94
-
95
-
96
-
97
-
98
-
99
-
100
-
101
-
102
-
103
-
104
-
105
-
106
-
107
-
108
-
109
-
110
-
111
-
112
-
113
-
114
-
115
-
116
-
117
-
118
-
119
-
120
-
121
-
122
-
123
-
124
-
125
-
126
-
127
-
128
-
129
-
130
-
131
-
132
-
133
-
134
-
135
-
136
-
137
-
138
-
139
-
140
-
141
-
142
-
143
-
144
-
145
-
146
-
147
-
 148
148 -
 149
149 -
 150
150 -
 151
151 -
 152
152 -
 153
153 -
 154
154 -
 155
155 -
 156
156 -
 157
157 -
 158
158 -
159
-
160
-
161
-
162
-
163
-
164
-
165
-
166
-
167
-
168
-
169
-
170
-
171
-
172
-
173
-
174
-
175
-
176
-
177
-
178
-
179
-
180
-
181
-
182
-
183
-
184
-
185
-
186
-
187
-
188
-
189
-
190
-
191
-
192
-
193
-
194
-
195
-
196
-
197
-
198
-
199
-
200
-
201
-
202
-
203
-
204
-
205
 |
 |
